Honeypots 102: Setting up a SANS Internet Storm Center’s DShield Honeypot
A Step-by-Step Guide to Setting Up a SANS DShield Honeypot to Join the Cybersecurity Fight and Learn Along the Way!

· Introduction
· What Is DShield Honeypot?
· Other Benefits Of Using DShield
· How Does It Work
· What Is Collected?
· Pre-requisites
· Setting Up DShield Client
· Accessing Your DShield Data
· Updating And Tweaking DShield
· Important Notes On Security
· Review of the DShield Honeypot
· Conclusion
· Further Reading
Introduction
In my previous article “Honeypots 101: A Beginner’s Guide to Honeypots”, we covered what honeypots are, why we use them and the different types of honeypots that are available.
If you have not seen it and want to brush up on the different types of honeypots or what “low-interaction” honeypot means, have a quick read of that article before you proceed.
In this article, I will be covering the first of a few honeypots I am going to experiment with as part of my home lab security projects. The first honeypot we would like to start with has to ideally, meet several criteria:
- Easy Setup: Easy to set up and deploy with setup guides widely available.
- Community Support: Access a robust community for ongoing assistance and knowledge sharing.
- Centralized Logging: Provides a centralized logging database for easier analysis and trend identification.
- Dashboards & Insights: Provides dashboards, analytics, and data visualizations for real-time monitoring and simplified reporting.
The honeypot we have chosen fits the bill. In fact, it has two key advantages over similar honeypot projects.
- Collaborative Threat Intelligence: By being part of SANS STORM, you are contributing to and leveraging a global network of honeypots for shared threat intelligence.
- Contribute to Global Security: By sharing your node with SANS Internet Storm Center, you are helping identify emerging threats and improving global cybersecurity efforts.
These honeypots not only attract attackers, but they also waste their time and energy. As they interact with these decoys, their tactics and the sources of automated attacks are revealed, providing valuable insights and serving as an early detection system for threats.
What Is DShield Honeypot?
The SANS Internet Storm Center’s DShield honeypot is a lightweight system designed to collect data on malicious internet activity by simulating common services that attract attackers. It sends this data to a central repository for analysis, contributing to a global network of honeypots that provide threat intelligence to the cybersecurity community.
DShield is a low-interaction honeypot that allows the SANS Internet Storm Center to collect honeypot data for research purposes.
The DShield honeypot has the following components:
- SSH/Telnet honeypot: collects SSH and Telnet usernames and passwords via Cowrie.
- Web Logs: HTTP honeypot collecting full HTTP requests.
- Firewall Logs: collects firewall logs from the honeypot.
The DShield honeypot uses scripts to simulate vulnerable services, but it’s not an actual vulnerable machine or “full interaction” honeypot.
A full interaction honeypot is a realistic system with genuine operating systems and services, allowing attackers to fully interact as they would with a real target, often at a higher risk.
In contrast, the honeypot setup here creates a controlled environment where vulnerabilities are simulated without exposing actual risks.
Low-interaction honeypots provide minimal interactivity to attackers, simulating just enough to attract and capture attacks on a specific service. Because they’re limited in what they simulate, adversaries can’t perform any post-exploitation activities or fully exploit these honeypots.
Other Benefits Of Using DShield
Let’s recap the benefits outlined in the Introduction section:
- Running a honeypot is a fun and educational cybersecurity project.
- Your data contributes to a collaborative threat intelligence feed.
- You are contributing to global security monitoring efforts.
Beyond those benefits, SANS offers free access to DShield project data sets for the broader community, addressing common questions such as
- Is this host attacking just me or everybody?
- What are they usually looking for?
Avoid using SANS’s DShield data as a blanket ban list for blocking suspected IPs. Doing so might lead to false positives and block legitimate traffic.
The SANS DShield project offers the following types of Data Feeds:
Daily Sources
- Daily at 4 am UTC
- Lists of all source IPs and destination ports
- Great to import into your own database or threat feeds
Research Feed
- Raw data (without target IPs)
- Great for cybersecurity researchers
How Does It Work

The process below is a high-level overview of how the DShield honeypot interacts with the SANS Internet Storm Center.
- The honeypot captures data from services like SSH and Telnet, storing it locally as flat text files.
- A parser checks the logs to ensure they have the correct format, then converts them into a standardized structure, typically JSON, XML or CSV.
- These formatted logs are sent to the SANS Internet Storm Center via HTTP REST APIs every 30 minutes.
- The data is then stored in the central SANS Storm database.
- Once in the database, the logs are analyzed to identify trends, patterns, and emerging threats. This analysis contributes to the SANS Internet Storm Center’s ongoing threat intelligence efforts.
You don’t need to understand DShield’s internal architecture to set up a honeypot node (also called a DShield Sensor); the installation process handles everything, including automatic updates and regular data uploads to the centralized SANS Internet Storm Center database. But if you’re the kind of Maverick who likes to see what’s happening under the hood, stick around — I’ve got you covered in the section below.
DShield Sensor Components
- Cowrie: an SSH/Telnet honeypot that simulates vulnerable systems to capture brute force attacks, including connection attempts, usernames, and passwords.
- web.py: simulates web-based services to capture and analyze HTTP traffic. It is used to detect common attack patterns, like brute-force attacks on web-based login interfaces, scanning for vulnerabilities, or other unauthorized activity targeting web servers.
- tcp-honeypot.py: simulates vulnerable TCP-based services, logging connection attempts, source IPs, and targeted ports.
- dshield.py: this is the core script that collects data from various honeypot sources, processes it, and formats it for submission to the SANS Internet Storm Center. In newer
- fwlogparser.py: parses firewall logs for relevant data, facilitating analysis and threat detection by the SANS Internet Storm Center.
Cowrie and Web.py components are limited interaction honeypots and do not allow the attacker to execute code.
What Is Collected?
DShield honeypots collect data to track suspicious network activity and identify potential threats. Here’s a summary of what they gather and how it’s used.
- SSH and Telnet usernames and passwords via Cowrie.
- Full HTTP requests.
- Firewall logs.
The DShield sensor and honeypot are designed to analyze only Internet traffic from public IP addresses. No internal or non-public data from your honeypot is shared with DShield.
Let’s take a closer look at each category to understand what information is collected.
SSH/Telnet Brute Force Attempts
- IP addresses of the source attempting the connection.
- Destination ports targeted during the brute force attempt.
- Attempted usernames and passwords.
- Timestamps indicating when the attempts occurred.
Web Logs
- Source IP addresses from where web requests originated.
- URLs or endpoints that were accessed.
- HTTP methods used (GET, POST, etc.).
- HTTP status codes returned by the server.
Firewall Logs
- Source and destination IP addresses involved in the traffic.
- Network protocols used (TCP, UDP, etc.).
- Port numbers targeted or used in the connection.
- Timestamps of each logged event.
Pre-requisites
1. Device Setup
The SANS Internet Storm Center agent, also known as DShield, has a very small footprint, requiring minimal CPU, memory, and disk resources. This makes it ideal for low-spec devices like Raspberry Pi. The DShield client was designed with such compact and energy-efficient setups in mind.
The honeypot uses very little processing power or memory. It doesn’t require much disk storage either, as logs are sent to DShield every 30 minutes instead of being permanently stored on your local disk.
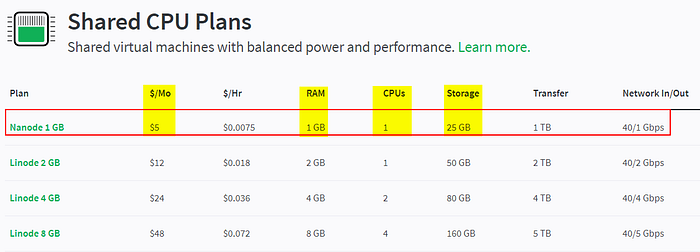
For our experimental project, we’ll use a Linode Virtual Private Server (VPS) from Akamai’s Linode, running Debian 11 Linux on a Shared CPU Plan, which is more than sufficient for our needs.
Although DShield is designed with low-cost Raspberry Pi honeypots in mind, it supports most major Linux distributions. The project recommends Debian-based systems like Raspbian OS and Ubuntu Linux.
You can set this up with a Raspberry Pi but I am going to use a Linode VPS by Akamai, with the following specifications:
- VPS: Nanode 1GB Shared CPU Plan
- CPU: 1 Core
- RAM: 1GB
- Disk: 25GB
- OS: Debian 11 (Buster)
- Cost: $5/mo
Linode VPS is a Linux-based virtual private server service, offering a cost-effective and less complex alternative to AWS and Azure. It’s ideal for quick setup and straightforward use in home labs and cybersecurity learning projects.
Setting up the VPS is beyond the scope of this article, but don’t worry — Linode offers great guides, an active community, and super-responsive support to help you get started.
DShield works with various setups, including cloud instances, virtual machines, and even devices like Raspberry Pis, routers, or firewalls. Just make sure your device has direct internet connectivity and allows inbound firewall rules so attackers can find and probe your services.
Remember, careful planning and extreme caution are crucial to avoid exposing your network to external threats.
2. Internet Connectivity
A DShield honeypot needs direct Internet access. If it’s public-facing, you’re all set. Your Linux server running DShield should have inbound and outbound Internet connectivity.
For cloud instances, check your provider’s firewall settings to ensure traffic can flow freely to and from your instance without getting blocked.
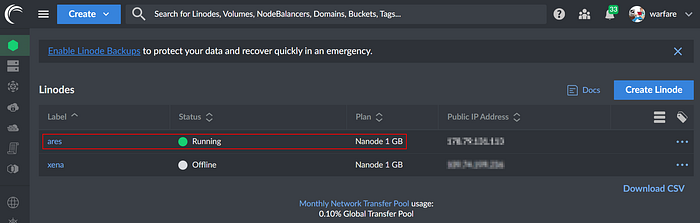
On my Linode VPS, the default configuration by Akamai (Linode) allows all inbound and outbound traffic to the assigned public IP address.
However, if your honeypot is behind a router with private IP addressing, like in a typical LAN, you’ll need to set up port forwarding to let external traffic reach the honeypot.
You’ll need to forward SSH, Telnet, and web traffic, but it’s also important for the honeypot to see all unsolicited inbound traffic to capture attack trends through firewall logs. This way, it can receive connections and send logs to the SANS Internet Storm Center.
Here’s how I set up my home router’s firewall rules to forward SSH, Telnet, and web traffic to my secondary honeypot running on a Raspberry Pi.
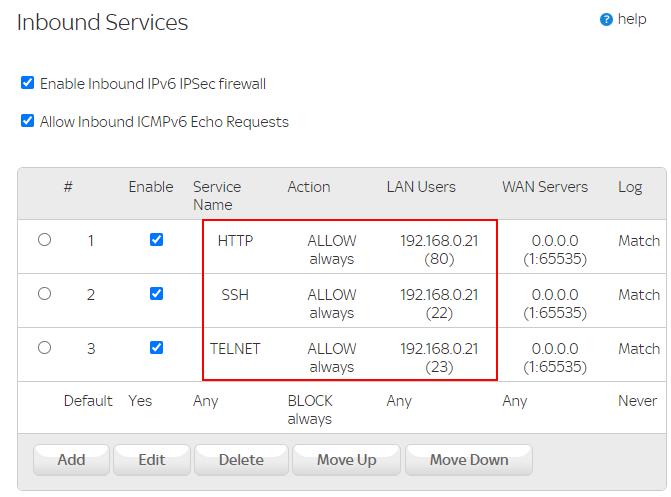
For home network users, routers typically offer settings like “exposed host” or “DMZ” to route all external traffic to a specific internal IP, often used for a Raspberry Pi honeypot. Additional configuration might be needed to ensure all traffic directs to the Pi’s internal IP, not just specific ports like 80.
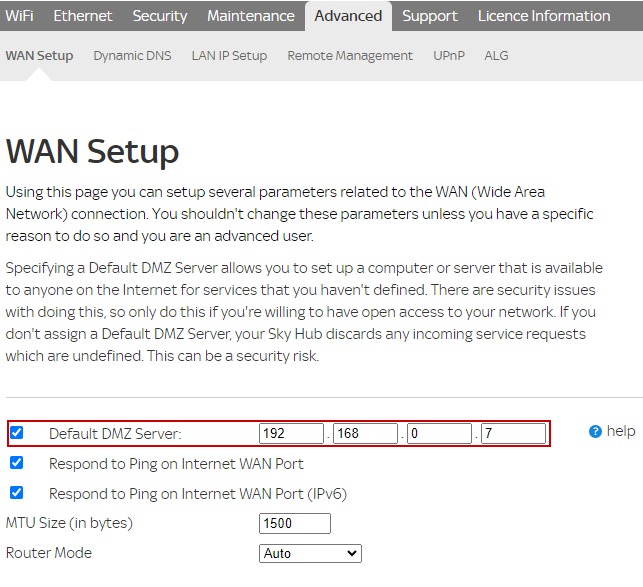
Be cautious with the latter option, as it exposes your internal network to the Internet, which means that if the honeypot is compromised, it could lead to a breach of your home network. Under no circumstances should you deploy a honeypot like this at work, as the risks are too high.
Make sure your honeypot on your home network has a static IP address, or you might accidentally open the gates of hell to another device if the IP address changes.
3. DShield Account
For your DShield honeypot to send information to the SANS Internet Storm Center, you need a valid account and an API key, which you receive when you create an account.
Head to Internet Storm Center’s registration page and “Sign Up”.
URL: https://isc.sans.edu/register.html
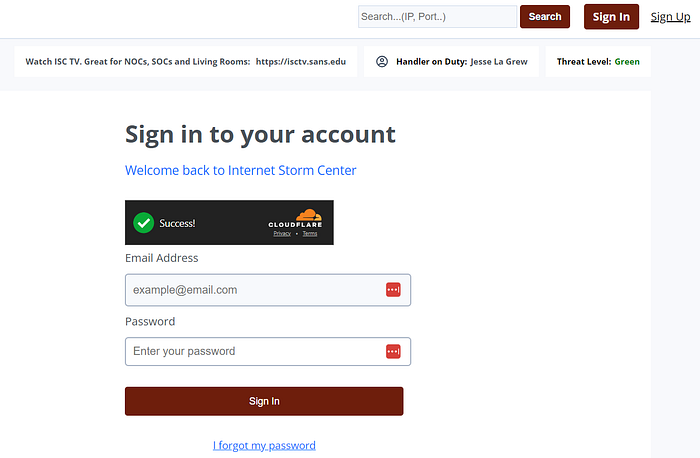
After signing up, be sure to verify your email address. If you don’t see the verification email from “ISC Automailer” <info@dshield.org>, check your spam folder.

Once logged in, take note of your User ID and API Key in the “My Account” section of the DShield website.
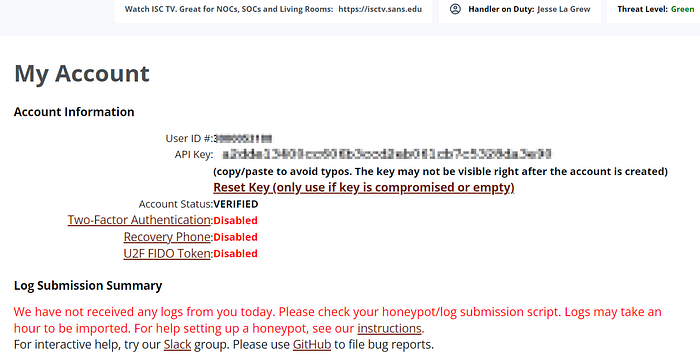
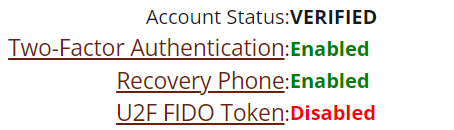
While you’re at it, enable Two-Factor Authentication as a minimum. We’re security-minded folks after all, right? 🔐
With that, we are now set to set up our Linux server to become a DShield node or sensor. We’ll cover that in the next session.
Setting Up DShield Client
Now that we’ve covered the basics of a DShield honeypot, prepared a Linux device and created a DShield account, let’s dive into the detailed steps for setting up the DShield Sensor in this section using our Linode VPS running Debian 11.
Note: For OS-specific installation not covered here please see the list below:
Log on to your device and update the system before we start.
sudo apt update && sudo apt upgrade -yDownload Git and Python3 if you don’t already have it installed.
sudo apt install git python3 python3-pipChoose a suitable location to download DShield.
cd /opt
sudo git clone https://github.com/DShield-ISC/dshield
Run the installer script in the bin/install directory.
sudo /opt/bin/install.shThis install.sh script will perform the following tasks:
- Disable IPv6 on the device
- Enable firewall logging and submitting of logs to DShield
- Change your ssh server to listen on port 12222
- Install the SSH honeypot Cowrie
- Install the needed environment (e.g. MySQL, Python packages, etc.)

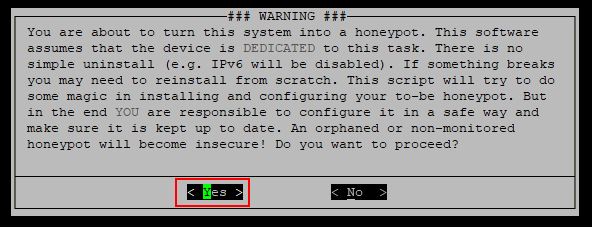
Press Enter to continue the script. At the warning prompt, which you should definitely read, press Enter to accept the “Yes” option.
Read the Privacy Notice, then select “Yes” and hit Enter to confirm.

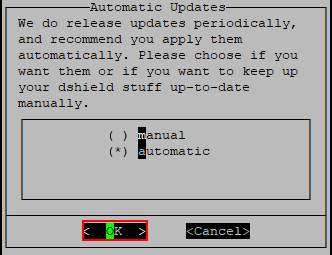
To keep updates on “automatic”, select “OK” and press Enter.
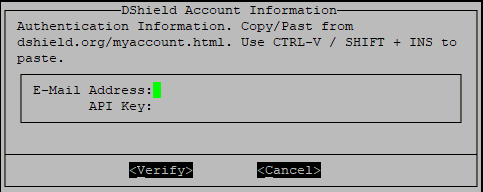
At the next prompt, you are asked for the email address you used to sign up for the DShield account earlier and your API Key. Copy them from your “My Account” page and hit Enter on the “Verify” option.
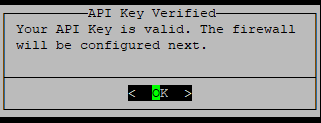
If successful, you should receive the following prompt.
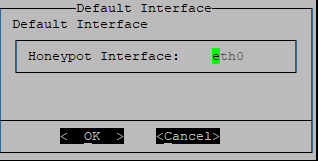
The next prompt asks you to confirm the default network interface for your honeypot. Unless you have multiple interfaces and know what you’re doing, just accept the default. In most cases, it’s “eth0” for the primary Ethernet (LAN) interface. If you’re using a wireless connection, like on a Raspberry Pi, it might be “wlan0.”
The next prompt asks you to confirm your honeypot’s network and remote access details. Before accepting the default values, see the “Note” below. 👇
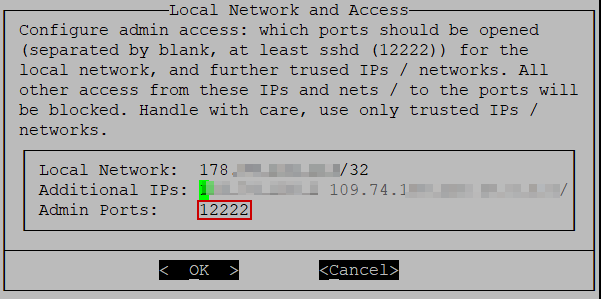
- Local Network: This is your internal IP address range, typically something like “192.168.1.0/24” or “10.0.0.0/24.” It tells DShield what’s internal and what’s not.
- Additional IPs: If you have extra IPs or subnets you consider part of your local network, you list them here. This is usually the IP of the machine you are currently connected to as well as the router’s IP. Occasionally, it may be empty and you may need to add more internal IPs. Accept the default values for now.
- Admin Ports: These are the ports used for administrative tasks, DShield’s default setup moves the real SSH port to 12222. It helps DShield distinguish legit admin traffic from other activity.
👉 Note: If your honeypot is on a cloud or VPS instance, use your public IP and adjust DShield’s default /24 to /32 to ensure all other IPs are treated as external. For example, 178.79.131.xxx/32. This avoids whitelisting an entire cloud subnet and mistakenly classifying your neighbors as part of your trusted LAN.
For my Linode VPS with a single public IP, I have used the following values:
- Local Network: 178.79.131.xxx/32 (my single public IP)
- Additional IPs: 46.64.56.xxx (my public Sky Broadband IP)
- Admin Ports: 12222 (default port for SSH remote management)
Tip: To find out your public IP address use websites such as WhatIsMyIP.
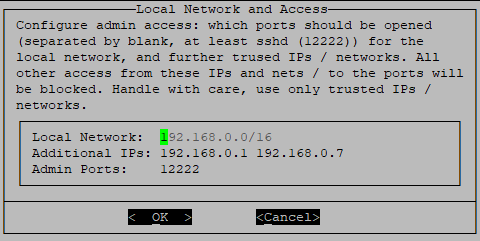
The below screenshot is an example of my secondary honeypot on a Raspberry Pi behind my home router (LAN).
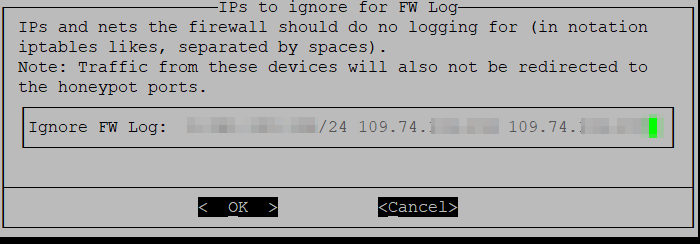
Specify the IP addresses or network ranges in CIDR notation where the honeypot’s firewall should not log traffic, reducing unnecessary alerts from trusted IPs used to manage the honeypot.
Specify which IP addresses, networks, or ports should be exempt from honeypot reporting. This helps avoid false alerts by preventing the honeypot from reporting legitimate internal traffic. If you’re unsure, stick with the default settings, particularly for port numbers.

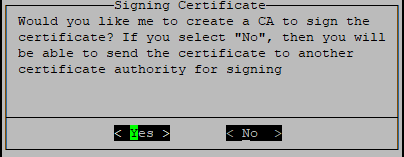
Enter your details or accept the defaults for creating an SSL certificate.
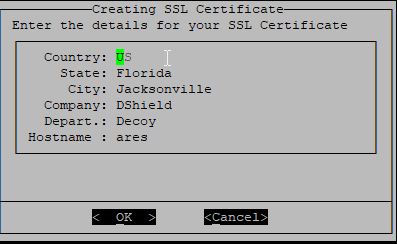
Choose “Yes” here. We’re ok with self-signed certificates for now.
At this point, the installation of the agent is complete and a post-install screen is shown.

Well done for making it this far! It’s now time to reboot the honeypot.
sudo shutdown -r nowOnce the reboot has been completed, log on to the honeypot device, and check the status of the honeypot to verify successful installation and connection back to SANS DShield.
sudo /opt/dshield/bin/status.shYou should see a screen similar to the one below.
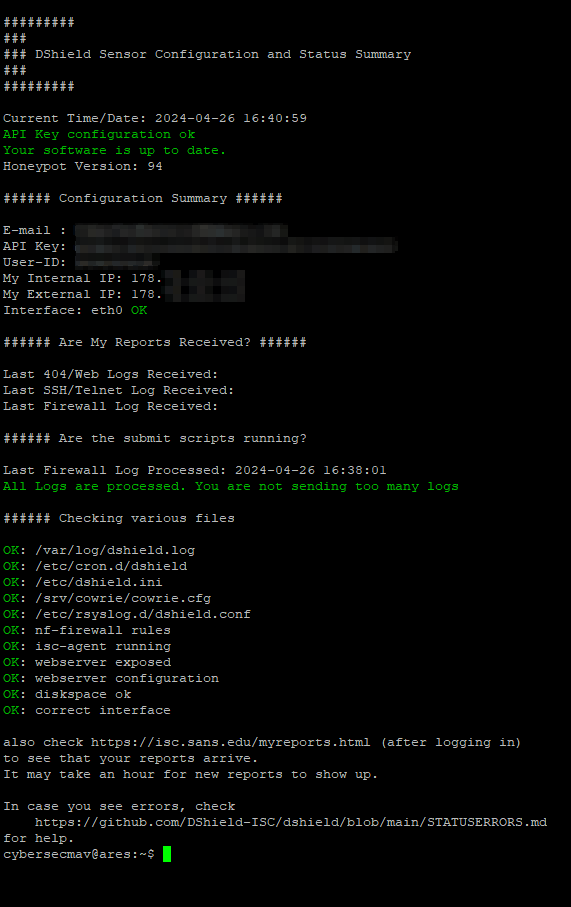
The script must confirm that the honeypot was installed and configured correctly. Just as critical is ensuring you have direct inbound and outbound access for the honeypot to function correctly. Otherwise, see the “Troubleshooting” section on DShield’s project page.
If the installation went smoothly, the script will indicate that no logs have been sent to SANS DShield yet. It’s recommended to give it at least 30 minutes before checking your honeypot data on the DShield website.
Accessing Your DShield Data
After installing the DShield honeypot software, give it at least 30 minutes to ensure it’s running properly. Use the status.sh script to check if the installation was successful and to confirm that your firewall has uploaded data to SANS. Once that's done, log in to your SANS DShield dashboard to see your honeypot data in action!
URL: https://www.dshield.org/login.html

The SANS DShield dashboard aggregates data from all contributing honeypots, not just yours. To find your specific data, navigate to the following sections below.
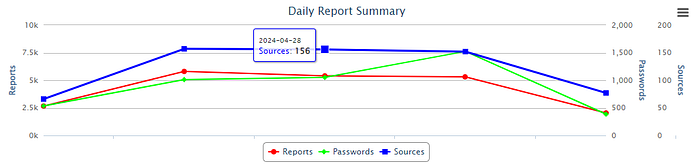
▶️ My Account
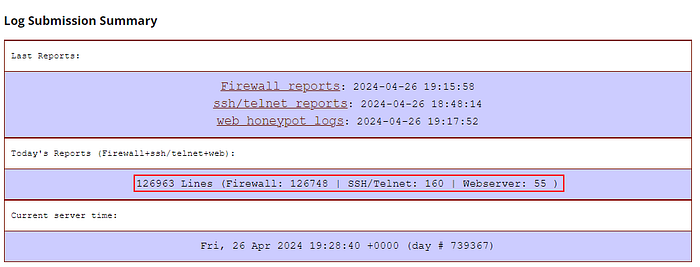
In this section, you’ll find a summary of the logs that your honeypot has sent to the SANS Internet Storm Center.
URL: https://www.dshield.org/myaccount.html
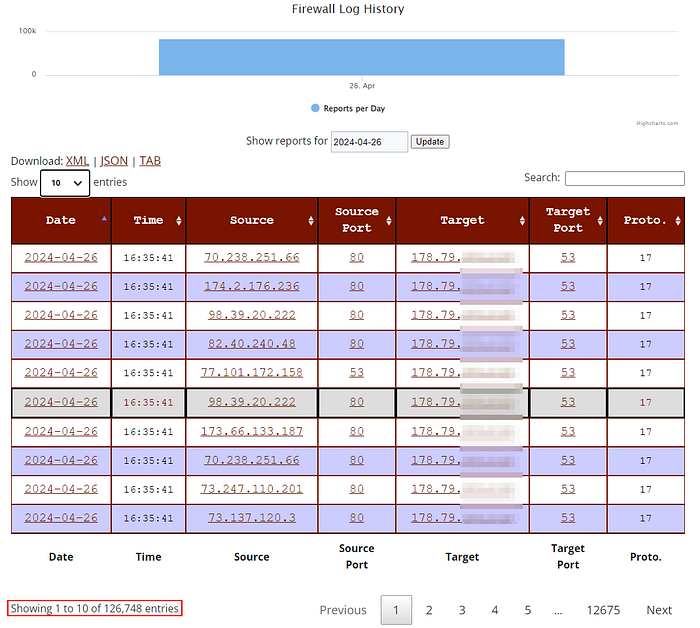
▶️ Firewall Logs
This section of the website gives you an overview of the firewall logs collected from your honeypot. As you can see, there were quite a few hits on the firewall after just two hours of running the honeypot.
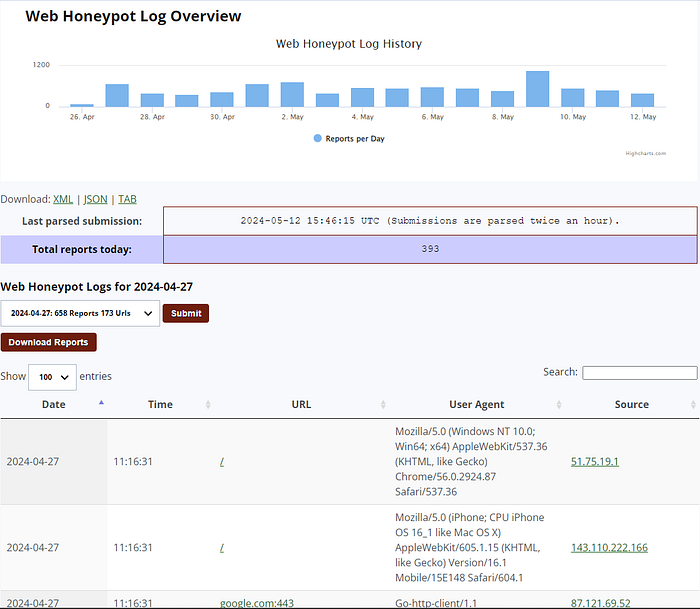
▶️ Web Honeypot Logs
The Web Honeypot Logs section contains all the data your honeypot collected, destined for your fake web service. The honeypot HTTP doesn’t run a full-function web server, so it is only able to capture the HTTP requests containing the following data:
- Date & Time: Timestamp of the HTTP requests.
- URL: Contains the requested resource or endpoint, often revealing attacker intentions or payloads.
- User-Agent: Identifies the client making the request, useful for revealing patterns, identifying certain automated scanners, or fingerprinting bots.
- Source: Originating IP address of the attacker or web scanner.
Note: The honeypot can be configured to log additional data locally (without sending it to DShield), providing more comprehensive information for personal analysis and insights. See the following article:
▶️ SSH/Telnet Logs
This section presents an overview of all data gathered by your honeypot from SSH and Telnet interactions. These logs include captured SSH and telnet usernames, passwords, and source IPs, offering some insights and trends into potential attacker activity.

Updating And Tweaking DShield
If you didn’t choose automatic updates during the DShield installation or prefer to manage updates manually, you can follow the steps below to update your DShield setup manually.
Option 1: Simple Update Using Git
Navigate to the DShield directory and pull the latest changes from the GitHub repository. Then, run the installation script with the --update flag to apply any necessary changes.
cd /opt/dshield
git pull
sudo bin/install.sh --update
Option 2: Automatic Updates as Needed
Newer versions of DShield support automatic updates, which you can trigger manually if required. Navigate to the DShield bin directory and run the update.sh script to check for updates and install them.
cd /opt/dshield/bin
sudo ./update.sh
DShield Configuration File
The /etc/dshield.ini document is a configuration file used by the DShield honeypot software to specify various settings for its operation. Let’s look at some of the common settings that you may want to modify at a later stage.
- Honeypot IP Address: The
honeypotipsetting specifies the IP address on which the honeypot listens for incoming connections. - Listening Ports: Defines the ports on which the honeypot services are running, such as SSH, Telnet, or HTTP.
- Excluded IP Addresses: Specify IP addresses or ranges to exclude from logging or reporting. I often change this to include more IP addresses belonging to me that I have forgotten to whitelist. The variables you need to edit are
nofwloggingandlocalips. - SSH Admin Port: The
adminportsspecify the port you can use to remotely administer the honeypot. Commonly the SSH server port. - Auto Update: the
manualupdates, variable specifies if the honeypot software should update automatically or manually. Set to 0 for Automatic Update and to 1 for Manual. - Update Frequency: the variable
submit_logssets how often the honeypot checks for updates or sends data to the SANS Internet Storm Center.

Important Notes On Security
Running a honeypot on a publicly accessible machine inevitably makes it a target for compromise. It’s crucial to acknowledge this reality and implement some security best practices to harden your server and reduce the chances of take over or compromise of your honeypot server.
- Keep the Linux server hosting the honeypot updated with critical OS and security patches regularly.
- Enable automatic updates for the DShield client to receive new functionalities and security updates promptly.
- Use strong and unique passwords for all accounts associated with the honeypot to mitigate the risk of compromise.
- Ensure the honeypot is isolated from your home or work network, especially for learning purposes, by using a public cloud instance with no network ties.
- Implement SSH security measures such as disabling root login, disabling empty password login, and transitioning from Password Authentication to Public Key-based Authentication by using SSH keys.
The article below details all the steps I have taken to secure my honeypot’s SSH server configuration. I recommend implementing all the recommendations in that article to protect your honeypot from compromise.
Review of the DShield Honeypot
Pros
- Requires minimal resource consumption, making it suitable for use on devices like Raspberry Pi or low-spec cloud instances.
- Participation in a global collaborative cybersecurity effort.
- Offers an engaging and educational home lab project for learning about cybersecurity.
- Simple setup process with provided dashboards by the project.
Cons
- Limited protocol support, focusing mainly on HTTP, SSH, and Telnet.
- Dashboards and analytics options are limited, providing few visualization choices. In-depth analysis may require downloading logs for further examination.
- Being a low-interaction honeypot, it lacks advanced capabilities and direct interactions with attackers.
Conclusion
Setting up a honeypot is an ideal project for both newcomers to cybersecurity and seasoned professionals seeking a hands-on and enjoyable weekend project away from their day-to-day cybersecurity tasks.
After all, who wouldn’t find it entertaining to watch bots and hackers alike get excited over your honeypot, only to watch them fail?
Remember, while it’s a fun learning experience, it’s crucial to prioritize safety. Never deploy a honeypot in a work environment, and always take necessary precautions to safeguard your honeypot server from potential compromise and avoid contributing to a botnet.
Additionally, don’t hesitate to dive deeper into the data by downloading it for further analysis. Beyond the offerings of DShield dashboards, conducting your own analysis can provide valuable insights and enhance your learning journey.
Stay tuned for a follow-up article in this series with my analysis of the captured DShield data, and feel free to follow along on this journey of exploring honeypots! 🍯
Thank you for your interest and for visiting my blog!
As I continue my honeypot project, I look forward to sharing my experiences and insights with you.
Now, Go and Play!
Further Reading
- Honeypots 101: A Beginner’s Guide to Honeypots 🍯
- Honeypots 103: Decoding Your SANS DShield Honeypot’s Data 🍯
- Honeypots 104: T-Pot — Your All-in-One Honeypot Platform Guide 🍯
- A Guide To Securing Your Remote Access Using SSH Keys 🔐
- DShield Sensor Project
- Installing the DShield Honeypot on a Raspberry Pi
- TryHackMe: Introduction to Honeypots