picoCTF 2024 — Write-up — Forensics
My Walkthrough of the picoCTF 2024 Forensics challenges

Challenges
· Scan Surprise
· Verify
· CanYouSee
· Secret of the Polyglot
· Mob Psycho
· Blast from the past
· Dear Diary
· Conclusion
Scan Surprise
The challenge provided us with an archive containing an image with a QR code.

To solve this challenge, we need to scan the QR code with our mobile phone camera or a QR reader app.
Stay safe! Never scan QR codes from unfamiliar or public sources to avoid potential malware or security risks.

A nice and easy one to warm up with :)
Flag: picoCTF{p33k_@_b00_3f7cf1ae}
Verify

The challenge provides us with a zip file which when extracted, we discover the following:
- The checksum we can use to match the correct “flag” file we need
- A decryption bash script to decrypt the flag file
- A sub-folder with over 300+ imitation flag files. Only one is the real flag file we need to find and decrypt.
$ cd home/ctf-player/drop-in

$ ls -la

total 28
drwxr-xr-x 3 cybersecmav cybersecmav  4096 Mar  9 17:05 .
drwxr-xr-x 3 cybersecmav cybersecmav  4096 Mar 24 16:54 ..
-rw-r--r-- 1 cybersecmav cybersecmav    65 Mar  9 17:05 checksum.txt
-rwxr-xr-x 1 cybersecmav cybersecmav   856 Mar  9 17:05 decrypt.sh
drwxr-xr-x 2 cybersecmav cybersecmav 12288 Mar  9 17:05 files
Let’s have a peek at what’s in the sub-folder files/.
$ ls -la files/*

total 1220
drwxr-xr-x 2 cybersecmav cybersecmav 12288 Mar  9 17:05 .
drwxr-xr-x 3 cybersecmav cybersecmav  4096 Mar  9 17:05 ..
-rw-r--r-- 1 cybersecmav cybersecmav    64 Mar  9 17:05 047MJYW7
-rw-r--r-- 1 cybersecmav cybersecmav    64 Mar  9 17:05 0CbGv6a3
-rw-r--r-- 1 cybersecmav cybersecmav    64 Mar  9 17:05 0E56AVSC
-rw-r--r-- 1 cybersecmav cybersecmav    64 Mar  9 17:05 0QUxtltc
-rw-r--r-- 1 cybersecmav cybersecmav    64 Mar  9 17:05 0XKkalUj
-rw-r--r-- 1 cybersecmav cybersecmav    64 Mar  9 17:05 0hBYiFqV
-rw-r--r-- 1 cybersecmav cybersecmav    64 Mar  9 17:05 0xx1tyUI
-rw-r--r-- 1 cybersecmav cybersecmav    64 Mar  9 17:05 1VpyYwwh

--SNIP--
This folder contains over 300 files. To narrow down the real flag file we have to use the checksum we were provided with and compared it with the checksums of all files in that folder. A matching checksum will reveal the correct file to us.
$ cat checksum.txt

467a10447deb3d4e17634cacc2a68ba6c2bb62a6637dad9145ea673bf0be5e02
Find the file that matches the hash we were given. A partial but unique part of the hash should be enough to compare with.
$ sha256sum * | grep "7dad9145ea673bf0be5e02"

467a10447deb3d4e17634cacc2a68ba6c2bb62a6637dad9145ea673bf0be5e02  c6c8b911
We have a match on a file:c6c8b911. Let’s view its contents.
$ cat c6c8b911

Salted__���05�.Q�+�P��&pE�?B�{M:��e�Wm�a4Wua��l�5�yU!����NA�
It seems like it’s encrypted. Let’s decrypt the flag file we identified as being the right one.
$ ./decrypt.sh files/c6c8b911

Error: 'files/c6c8b911' is not a valid file. Look inside the 'files' folder with 'ls -R'!
After reading and analyzing the bash script, we noticed that the script execution failed as the absolute and full path of the file was used from the challenge server which did not match our directory structure once we extracted the archive. Below is the decryption script decrypt.sh.
#!/bin/bash

        # Check if the user provided a file name as an argument
        if [ $# -eq 0 ]; then
            echo "Expected usage: decrypt.sh <filename>"
            exit 1
        fi

        # Store the provided filename in a variable
        file_name="$1"

        # Check if the provided argument is a file and not a folder
        if [ ! -f "/home/ctf-player/drop-in/$file_name" ]; then
            echo "Error: '$file_name' is not a valid file. Look inside the 'files' folder with 'ls -R'!"
            exit 1
        fi

        # If there's an error reading the file, print an error message
        if ! openssl enc -d -aes-256-cbc -pbkdf2 -iter 100000 -salt -in "/home/ctf-player/drop-in/$file_name" -k picoCTF; then
            echo "Error: Failed to decrypt '$file_name'. This flag is fake! Keep looking!"
Any easy fix is to simply execute the command that decrypts the file including the provided AES key. Alternatively, edit and fix the script.
openssl enc -d -aes-256-cbc -pbkdf2 -iter 100000 -salt -in  files/c6c8b911 -k picoCTF

picoCTF{trust_but_verify_c6c8b911}
Bingo! We have successfully decrypted the right flag file and retrieved the flag.
Flag: picoCTF{trust_but_verify_c6c8b911}
CanYouSee
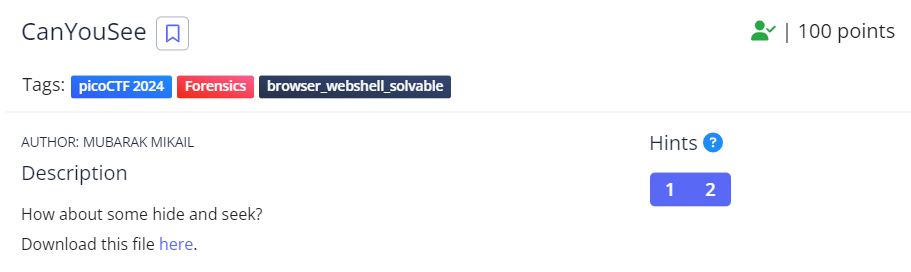
The challenge provides a JPG file and suggests something is hiding within the image. This is a classic Steganography challenge.
Image Steganography is the practice of extracting hidden information or solving challenges embedded within images. It involves analyzing the metadata, steganographic techniques, and other hidden messages within the image files to uncover clues or solutions. There are other forms of “stego” (for short) such as: audio, video, text, file, network and digital watermarking steganography.
Below is the image we have been given to analyze. Let’s get to work!

One of the easiest and first checks I do is to read the image metadata with tools such as ExifTool.
EXIF (Exchangeable Image File Format) information provides metadata embedded within digital images, including details such as camera settings, date and time of capture, GPS coordinates, and more.
ExifTool is a powerful command-line tool used for reading, writing, and editing metadata in digital files, including images, audio files, and documents.
$ exiftool ukn_reality.jpg

ExifTool Version Number         : 12.76
File Name                       : ukn_reality.jpg
Directory                       : .
File Size                       : 2.3 MB
File Modification Date/Time     : 2024:02:15 22:40:14+00:00
File Access Date/Time           : 2024:02:15 22:40:14+00:00
File Inode Change Date/Time     : 2024:03:24 17:20:43+00:00
File Permissions                : -rw-r--r--
File Type                       : JPEG
File Type Extension             : jpg
MIME Type                       : image/jpeg
JFIF Version                    : 1.01
Resolution Unit                 : inches
X Resolution                    : 72
Y Resolution                    : 72
XMP Toolkit                     : Image::ExifTool 11.88
Attribution URL                 : $ echo "cGljb0NURntNRTc0RDQ3QV9ISUREM05fZGVjYTA2ZmJ9Cg==" | base64 -d
picoCTF{ME74D47A_HIDD3N_deca06fb}==
Image Width                     : 4308
Image Height                    : 2875
Encoding Process                : Baseline DCT, Huffman coding
Bits Per Sample                 : 8
Color Components                : 3
Y Cb Cr Sub Sampling            : YCbCr4:2:0 (2 2)
Image Size                      : 4308x2875
Megapixels                      : 12.4
We seem to have an encoded string as a value for the “Attribution URL” field instead of a typical URL value. Let’s examine it for any Base64 encoding:
$ echo "cGljb0NURntNRTc0RDQ3QV9ISUREM05fZGVjYTA2ZmJ9Cg==" | base64 -d
picoCTF{ME74D47A_HIDD3N_deca06fb}
Easy day in the office, eh?
Flag: picoCTF{ME74D47A_HIDD3N_deca06fb}
Secret of the Polyglot
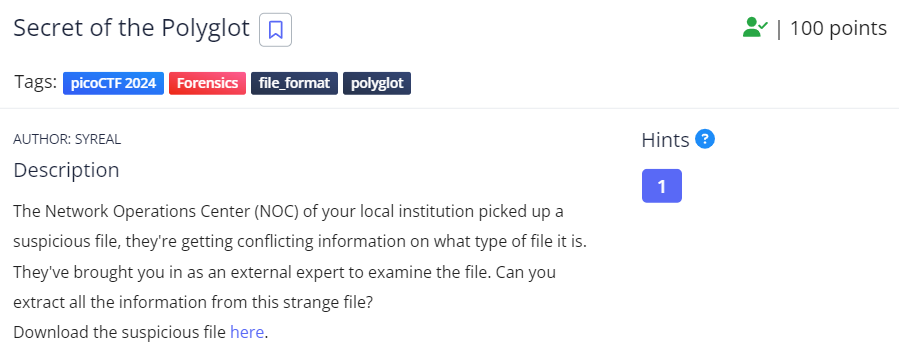
The challenge suggests that the provided file needs to be analyzed carefully to establish its “correct” file type before attempting to extract information (flag) from it.
We have been provided with a file named: flag2of2-final.pdf
Before we dive into any analysis, let’s open the PDF file and see what it may contain.
Great! We got the second part of the flag already. So where’s part 1?
Let’s start by examining the file for metadata, starting with PDF metadata.
$ pdfinfo flag2of2-final.pdf

Producer:        GPL Ghostscript 10.01.2
CreationDate:    Wed Feb  7 17:50:31 2024 GMT
ModDate:         Wed Feb  7 17:50:31 2024 GMT
Custom Metadata: no
Metadata Stream: yes
Tagged:          no
UserProperties:  no
Suspects:        no
Form:            none
JavaScript:      no
Pages:           1
Encrypted:       no
Page size:       595 x 842 pts (A4)
Page rot:        0
File size:       3362 bytes
Optimized:       no
PDF version:     1.4
PDFinfo is a command-line utility used to extract metadata and information from PDF files, including details such as title, author, creation date, page count, and more.
Nothing was found using pdfinfo tool. Let’s verify the file type first:
$ file flag2of2-final.pdf
flag2of2-final.pdf: PNG image data, 50 x 50, 8-bit/color RGBA, non-interlaced
This is our first clue that the file was incorrectly saved as a PDF but the file signature suggests it is a PNG image. Very odd as the file was a valid PDF which gave us part of the flag. What exactly is a Polyglot?
A polyglot is a type of file that is designed to be valid and executable in multiple programming languages or file formats simultaneously. These files can be crafted to exploit vulnerabilities or bypass security measures in different systems or applications as they take advantage of ambiguities or differences in how different software interprets their content. Polyglots can be used for various purposes, including malware delivery, cross-site scripting (XSS) attacks, and other forms of cyberattacks.
So our file can be both, a valid PDF file and potentially a valid PNG image file. Neat!
Let’s rename our filename to flag2of2.png and see what we get.

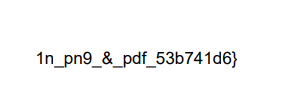
flag2of2.png has part 1 of the flagBingo. We can stop right here if we want to, but I am intrigued by this chameleon-like file which can pass itself as a valid file in multiple formats.
So far we have been able to view the file as a PDF and as a PNG file. Let’s keep examining our file more closely to see if there are more formats supported.
I have run several checks with the following tools:
- qpdf: for transforming and inspecting PDF files.
- exiftool: for reading, writing, and editing metadata in digital files.
- strings: for extracting human-readable text strings from binary files.
- bvi: a binary file editor designed for working with large files, offering both text and hexadecimal views.
Strings search yielded something interesting. The file might also be a Ghostscript file.
$ strings flag2of2-final.png
Let’s view the Ghostscript file with a command line tool.
Source: https://ghostscript.com/docs/9.54.0/Use.htm#Invoking
$ gs -dSAFER -dBATCH flag2of2-final.png
That’s a wrap, folks. We have the flag!
If you managed to find other file formats that it supports, please let me know!
I think I’ve exhausted my options and stopped at lucky number 3!
Flag: picoCTF{f1u3n7_1n_pn9_&_pdf_53b741d6}
Mob Psycho

In this challenge, we are given the objective of examining an Android application in the form of an APK file.
Once we download the file, we can simply extract the APK file.
$ unzip mobpsycho.apkLet’s examine the files and directory structure.
$ tree

├── AndroidManifest.xml
├── META-INF
│   ├── androidx.activity_activity.version
│   ├── androidx.annotation_annotation-experimental.version
│   ├── androidx.coordinatorlayout_coordinatorlayout.version
│   ├── androidx.fragment_fragment.version
│   ├── androidx.interpolator_interpolator.version
│   ├── androidx.versionedparcelable_versionedparcelable.version
│   ├── com
│   │   └── android
│   │       └── build
│   │           └── gradle
│   │               └── app-metadata.properties
│   ├── com.google.android.material_material.version
│   ├── kotlinx_coroutines_android.version
│   ├── kotlinx_coroutines_core.version
│   └── services
│       ├── kotlinx.coroutines.CoroutineExceptionHandler
│       └── kotlinx.coroutines.internal.MainDispatcherFactory
├── classes.dex
├── classes2.dex
├── classes3.dex
├── mobpsycho.apk
├── res
│   ├── anim
│   │   ├── abc_fade_in.xml
│   │   ├── abc_fade_out.xml
│   │   ├── abc_grow_fade_in_from_bottom.xml
│   │   ├── design_snackbar_out.xml
│   │   └── mtrl_card_lowers_interpolator.xml
│   ├── anim-v21
│   │   ├── design_bottom_sheet_slide_in.xml
│   │   ├── design_bottom_sheet_slide_out.xml
│   │   ├── fragment_fast_out_extra_slow_in.xml
│   ├── animator
│   │   ├── design_fab_hide_motion_spec.xml
│   │   ├── design_fab_show_motion_spec.xml


--SNIP--
We have tons of files and sub-folders so we need to find the needle in haystack. This is a job for the Linux find command.
$ find -name *flag*
./res/color/flag.txt
Very promising. We found a flag file! Let’s explore its contents.
cat ./res/color/flag.txt
7069636f4354467b6178386d433052553676655f4e5838356c346178386d436c5f35326135653264657d
Right, one more hoop to jump through. It looks like a Hex-encoded string.
$ cat ./res/color/flag.txt | xxd -p -r
picoCTF{ax8mC0RU6ve_NX85l4ax8mCl_52a5e2de}
Bingo! We now have the flag.
Flag: picoCTF{ax8mC0RU6ve_NX85l4ax8mCl_52a5e2de}
Blast from the past

For this challenge, we are provided with a picture that requires us to manipulate its metadata. We are tasked with changing ALL timestamps to 1970:01:01 00:00:00.001+00:00 with as much precision as possible for each timestamp.
First, we need to examine the current metadata using our trusty ExifTool.
$ exiftool original.jpg

File Name                       : original.jpg
File Modification Date/Time     : 2024:03:13 17:44:22+00:00
File Access Date/Time           : 2024:03:24 20:59:55+00:00
File Inode Change Date/Time     : 2024:03:24 20:59:44+00:00
File Type                       : JPEG
File Type Extension             : jpg
MIME Type                       : image/jpeg
Make                            : samsung
Camera Model Name               : SM-A326U
Software                        : MediaTek Camera Application
Modify Date                     : 2023:11:20 15:46:23
Date/Time Original              : 2023:11:20 15:46:23
Create Date                     : 2023:11:20 15:46:23
Time Stamp                      : 2023:11:20 20:46:21.420+00:00
Create Date                     : 2023:11:20 15:46:23.703
Date/Time Original              : 2023:11:20 15:46:23.703
Modify Date                     : 2023:11:20 15:46:23.703
We have quite a few timestamps and date values we need to change. The above results were summarised and kept brief. To narrow down the ExifTool results to only those lines with any association to “Time” or “Date”, we can use the following regular expression with grep:
$ exiftool original.jpg | grep -E 'Time|Date'
File Modification Date/Time     : 2024:03:13 17:44:22+00:00
File Access Date/Time           : 2024:03:24 19:09:04+00:00
File Inode Change Date/Time     : 2024:03:24 19:08:48+00:00
Modify Date                     : 2023:11:20 15:46:23
Exposure Time                   : 1/24
Date/Time Original              : 2023:11:20 15:46:23
Create Date                     : 2023:11:20 15:46:23
Sub Sec Time                    : 703
Sub Sec Time Original           : 703
Sub Sec Time Digitized          : 703
Time Stamp                      : 2023:11:20 20:46:21.420+00:00
Create Date                     : 2023:11:20 15:46:23.703
Date/Time Original              : 2023:11:20 15:46:23.703
Modify Date                     : 2023:11:20 15:46:23.703
We need to exclude the “Sub Sec” and “File Modification”, “File Access” and “File Inode Change” fields as they are not relevant to our task.
First, let’s make a copy of the original file so we can play with a copy to our hearts’ content.
$ cp original.jpg copy.jpgUsing the ExifTool we can edit the metadata and set the timestamps to the desired date as follows:
$ exiftool -DateTimeOriginal='1970:01:01 00:00:00.001' \
           -ModifyDate='1970:01:01 00:00:00.001' \
           -CreateDate='1970:01:01 00:00:00.001' \
           -DateTime='1970:01:01 00:00:00.001' \
           -SubSecTimeOriginal='001' \
           -SubSecTime='001' \
           -SubSecTimeDigitized='001' \
           -SubSecCreateDate='001' \
           -SubSecDateTimeOriginal='001' \
           -SubSecModifyDate='001' \
           -SubSecDateTime='001' \
           -ImageTimeStamp='1970:01:01 00:00:00.001' copy.jpg

Warning: Invalid date/time (use YYYY:mm:dd HH:MM:SS[.ss][+/-HH:MM|Z]) in Composite:SubSecCreateDate (PrintConvInv)
Warning: Invalid date/time (use YYYY:mm:dd HH:MM:SS[.ss][+/-HH:MM|Z]) in Composite:SubSecDateTimeOriginal (PrintConvInv)
Warning: Invalid date/time (use YYYY:mm:dd HH:MM:SS[.ss][+/-HH:MM|Z]) in Composite:SubSecModifyDate (PrintConvInv)
Warning: Tag 'SubSecDateTime' is not defined
Warning: Tag 'ImageTimeStamp' is not defined
    1 image files updated
Verify the changes made to copy.jpg image file:
$ exiftool copy.jpg | grep -E ('Time'|'Date')

--SNIP--
Modify Date                     : 1970:01:01 00:00:00
Date/Time Original              : 1970:01:01 00:00:00
Create Date                     : 1970:01:01 00:00:00
Sub Sec Time                    : 001
Sub Sec Time Original           : 001
Sub Sec Time Digitized          : 001
Date/Time Modified              : 1970:01:01 00:00:00.001
Time Stamp                      : 2023:11:20 20:46:21.420+00:00
Create Date                     : 1970:01:01 00:00:00.001
Date/Time Original              : 1970:01:01 00:00:00.001
Modify Date                     : 1970:01:01 00:00:00.001
All the dates except for one field, “Time Stamp”, were successfully changed.
Note: that we left out the file access, modification and inode time and dates.
Before we continue let’s first test our progress by submitting our modified picture to the remote server.
nc -w 2 mimas.picoctf.net 63462 < copy.jpgNow we can check what the outcome is by connecting to the second remote service:
$ nc mimas.picoctf.net 52225
MD5 of your picture:
b62538a2cfb92ad958408424fff76252  test.out

Checking tag 1/7
Looking at IFD0: ModifyDate
Looking for '1970:01:01 00:00:00'
Found: 1970:01:01 00:00:00
Great job, you got that one!

Checking tag 2/7
Looking at ExifIFD: DateTimeOriginal
Looking for '1970:01:01 00:00:00'
Found: 1970:01:01 00:00:00
Great job, you got that one!

Checking tag 3/7
Looking at ExifIFD: CreateDate
Looking for '1970:01:01 00:00:00'
Found: 1970:01:01 00:00:00
Great job, you got that one!

Checking tag 4/7
Looking at Composite: SubSecCreateDate
Looking for '1970:01:01 00:00:00.001'
Found: 1970:01:01 00:00:00.001
Great job, you got that one!

Checking tag 5/7
Looking at Composite: SubSecDateTimeOriginal
Looking for '1970:01:01 00:00:00.001'
Found: 1970:01:01 00:00:00.001
Great job, you got that one!

Checking tag 6/7
Looking at Composite: SubSecModifyDate
Looking for '1970:01:01 00:00:00.001'
Found: 1970:01:01 00:00:00.001
Great job, you got that one!

Checking tag 7/7
Timezones do not have to match, as long as it's the equivalent time.
Looking at Samsung: TimeStamp
Looking for '1970:01:01 00:00:00.001+00:00'
Found: 2023:11:20 20:46:21.420+00:00
Oops! That tag isn't right. Please try again.
It seems we have satisfied all the requirements except for one , the “Time Stamp” field still hasn’t changed to the date value of 1970.
I have also tried to use the tool exiv2 as the challenge hints mentioned that Exiftool may not work.
Hint 1: Exiftool is really good at reading metadata, but you might want to use something else to modify it.
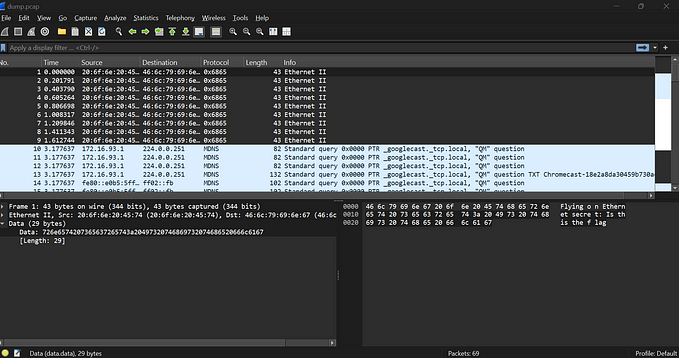
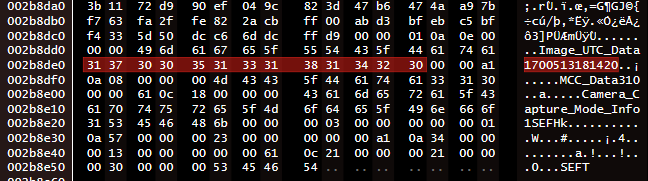
Time to explore other ways to glean more information out of the file. The tool strings yielded one interesting piece of data:
$ $strings original.jpg
8 /lR
yGFE`
(x94
*b*I*:
+!r }
@=9_^
Mn`l
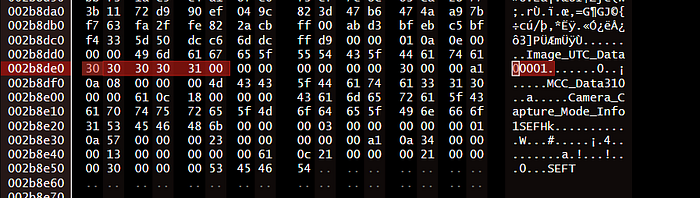
Image_UTC_Data1700513181420
MCC_Data310
Camera_Capture_Mode_Info1SEFHk
SEFTThe data item Image_UTC_Data1700513181420 seems like a Unix Epoch date format. Let’s verify that on the Unix Timestamp website.
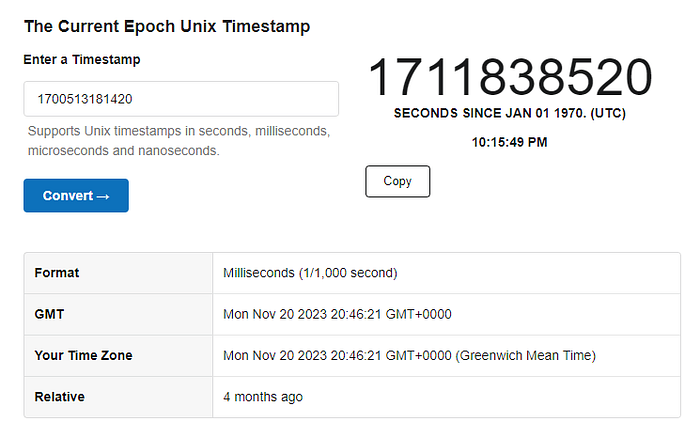
Epoch Unix Timestamp is a representation of time as the number of seconds that have elapsed since January 1, 1970, 00:00:00 UTC. It supports the format of a whole number representing the elapsed seconds, often used in programming and computing systems.
It turns out that the date (in milliseconds) matches exactly the date of the “Time Stamp” field, 2023 20:46:21 GMT+0000.
We have a new plan of action now we know how to set this value in the correct format: milliseconds since Jan, 1st 1970 00:00.
Again we are using the Epoch Unix Timestamp website to convert our date to Unix Timestamp. This is the first step.
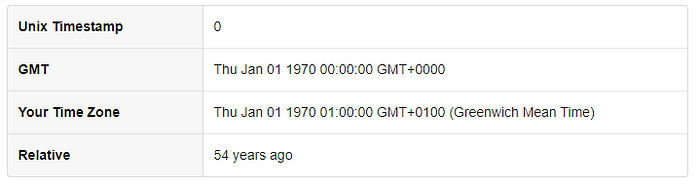
Why 0? Because the count starts from 1970 Jan 1st. So, zero seconds elapsed since!
The second step is to replace that “Image_UTC_Data1700513181420” value with our Unix timestamp of 0. For that, we can use any hex editor we like.
I suggest overwriting it by using 13 zeroes “0000000000000” to keep the metadata and file structure consistent.
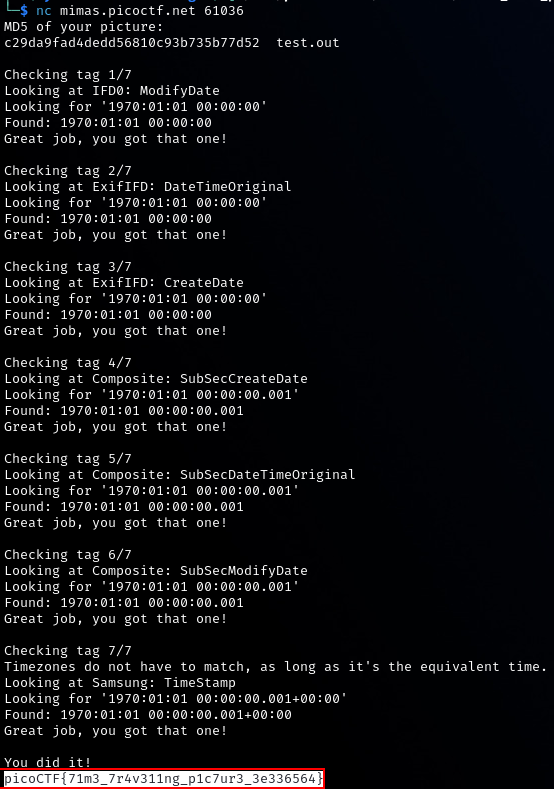
$ nc mimas.picoctf.net 59195
MD5 of your picture:
ea6909b837942ec23429708b4e2bdd07  test.out

Checking tag 1/7
Looking at IFD0: ModifyDate
Looking for '1970:01:01 00:00:00'
Found: 1970:01:01 00:00:00
Great job, you got that one!

Checking tag 2/7
Looking at ExifIFD: DateTimeOriginal
Looking for '1970:01:01 00:00:00'
Found: 1970:01:01 00:00:00
Great job, you got that one!

Checking tag 3/7
Looking at ExifIFD: CreateDate
Looking for '1970:01:01 00:00:00'
Found: 1970:01:01 00:00:00
Great job, you got that one!

Checking tag 4/7
Looking at Composite: SubSecCreateDate
Looking for '1970:01:01 00:00:00.001'
Found: 1970:01:01 00:00:00.001
Great job, you got that one!

Checking tag 5/7
Looking at Composite: SubSecDateTimeOriginal
Looking for '1970:01:01 00:00:00.001'
Found: 1970:01:01 00:00:00.001
Great job, you got that one!

Checking tag 6/7
Looking at Composite: SubSecModifyDate
Looking for '1970:01:01 00:00:00.001'
Found: 1970:01:01 00:00:00.001
Great job, you got that one!

Checking tag 7/7
Your picture doesn't have the Samsung: TimeStamp tag. Are you using the given picture in the problem description?
Something did not work as expected. I’ve had to do some research and concluded that the value of time was in milliseconds not in seconds. So we needed to input 00:00:00.001. Let’s hex-edit our image again as follows.
Let’s verify the change was successful:
$ exiftool copy.jpg | grep -E ('Time'|'Date')
--SNIP--
Time Stamp                      : 1970:01:01 01:00:00.001+01:00
Looks good. Time to re-upload and check again.
That was quite the task! We got there in the end :)
Flag: picoCTF{71m3_7r4v311ng_p1c7ur3_3e336564}
Dear Diary
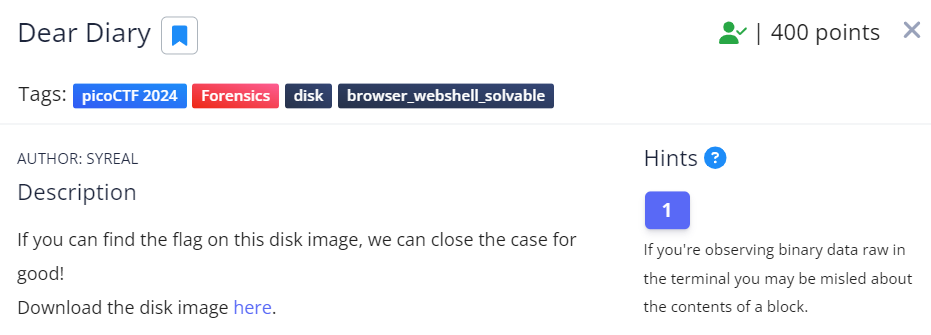
In this challenge, the picoCTF team has saved the best for last. By “best” we mean not necessarily the most difficult, but rather the most interesting in terms of forensics: Disk Forensics.
You have been provided with a disk image which you first need to decompress (GZ format) and then analyze to find the flag within the files of the disk image.
With the challenge task hinting at “closing the case for good” we deduce that they are leading us down the path of using Autopsy on Linux, creating a new forensics case and analyzing the disk before closing the case.
Indeed many players went down that route and it was a straightforward task. Create a case, attach the image, and use the search function. Done!
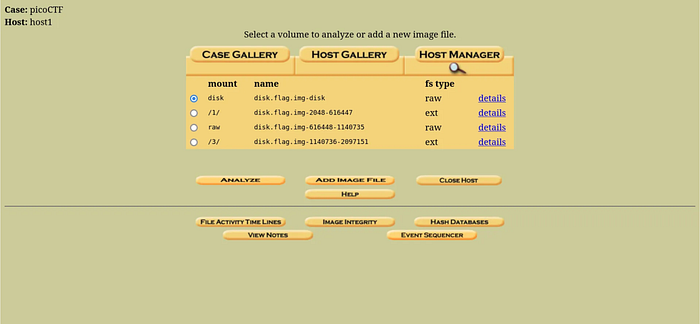
For some players, the hardest part about that solution was getting Autopsy up and running on their Linux machines. I’m not sure what hurdles they faced but I had autopsy running just fine on my Kali 2024 virtual machine.
However, we don’t want our final challenge to be that easy, do we? We won’t learn new and exciting things if we choose the quickest and easiest path always!
Let’s do it the old-skool way on the Linux console, the Maverick way!
We begin by extracting the image first.
gunzip disk.flag.img.gzTo glean more information about this image, we can start with file analysis.
$ file disk.flag.img

disk.flag.img: DOS/MBR boot sector; partition 1 : ID=0x83, active, start-CHS (0x0,32,33), end-CHS (0x26,94,56), startsector 2048, 614400 sectors; partition 2 : ID=0x82, start-CHS (0x26,94,57), end-CHS (0x47,1,58), startsector 616448, 524288 sectors; partition 3 : ID=0x83, start-CHS (0x47,1,59), end-CHS (0x82,138,8), startsector 1140736, 956416 sectors
The output of the file the command provides information about the disk image's partitions. Let's break down the output:
Partition 1:
- ID=0x83: Linux partition
- Active: This indicates that it’s the active partition.
- Start sector: 2048
- Number of sectors: 614400
Partition 2:
- ID=0x82: Linux swap partition
- Start sector: 616448
- Number of sectors: 524288
Partition 3:
- ID=0x83: Linux partition
- Start sector: 1140736
- Number of sectors: 956416
So we have two Linux partitions we can focus on. We’ll ignore the “swap” partition as it is a virtual memory partition.
Swap partition is a dedicated portion of a hard drive or SSD used by the operating system as virtual memory, enabling it to temporarily store and retrieve data when physical RAM is full.
Let’s continue with some more analysis before we mount the image and inspect its contents. Below are some example commands you can use for your disk image analysis.
mmls: is a tool that is part of The Sleuth Kit, commonly used for analyzing disk images and partition tables. Specifically, mmls is used to display the layout of partitions within a disk image or physical disk.
Display the layout of partitions within a disk image:
mmls disk.flag.img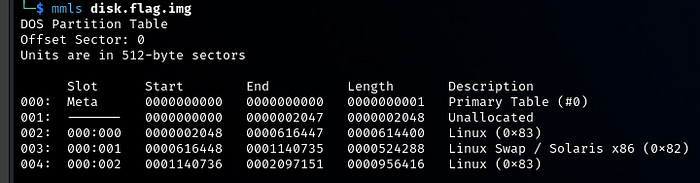
Next, we would like to have a directory listing of Partitions 1 and 3. Remember that Partition 1’s start sector is 2048 and Partition 3’s start sector is 1140736. We’ll be using these values going forward as the “offset” value.
fls: a command-line tool used in digital forensics for listing files and directories within a file system. It is part of The Sleuth Kit (TSK) suite.-o <offset>: specifies the starting offset within a disk image or a physical disk where the analysis should begin.
Directory listing for Partition 1:
$ fls -o 2048  disk.flag.img

d/d 11: lost+found
r/r 13: ldlinux.sys
r/r 14: ldlinux.c32
r/r 16: config-virt
r/r 17: vmlinuz-virt
r/r 18: initramfs-virt
l/l 19: boot
r/r 21: libutil.c32
r/r 20: extlinux.conf
r/r 22: libcom32.c32
r/r 23: mboot.c32
r/r 24: menu.c32
r/r 15: System.map-virt
r/r 25: vesamenu.c32
V/V 76913:      $OrphanFiles
Directory listing for Partition 3:
$ fls -o 0001140736  disk.flag.img
d/d 32513:      home
d/d 11: lost+found
d/d 32385:      boot
d/d 64769:      etc
d/d 32386:      proc
d/d 13: dev
d/d 32387:      tmp
d/d 14: lib
d/d 32388:      var
d/d 21: usr
d/d 32393:      bin
d/d 32395:      sbin
d/d 32539:      media
d/d 203:        mnt
d/d 32543:      opt
d/d 204:        root
d/d 32544:      run
d/d 205:        srv
d/d 32545:      sys
d/d 32530:      swap
V/V 119417:     $OrphanFiles
Remember that
-ois used for the offset or start sector of a partition. To specify certain files or directories, you have to use the inode numbers. In the output above, we are interested in examining the /root folder with the inode number204.
With our current information, Partition 3 seems like the more interesting choice. Let’s continue listing the directory listing.
$ fls -o 0001140736 disk.flag.img 204
r/r 1837:       .ash_history
d/d 1842:       secret-secrets
The /root folder has an interesting sub-folder named “secret-secrets”. Let’s explore that one further by using its offset of 1842.
$ fls -o 0001140736 disk.flag.img 1842
r/r 1843:       force-wait.sh
r/r 1844:       innocuous-file.txt
r/r 1845:       its-all-in-the-name
We have some interesting files under the/root/secret-secrets directory.
- innocuous-file.txt
- its-all-in-the-name
Disclaimer: Alongside The Sleuth Kit (TSK), I have used several other tools to verify my findings and also learn how to solve the problem in different ways. These tools include the Forensic Toolkit (FTK), Autopsy and Foremost.
I recommend exploring them to see what works best for you.
Let’s explore them more.
icat -o 0001140736 disk.flag.img 8 | strings Let’s break this command down.
icat: extract the content of a specific block or sector from a disk image.-o 0001140726: specifies the offer sectors within the disk image. In other words, the starting point from which icat will extract data.8: the number of sectors to extract starting from the specified offset..| strings: pipe to strings which will extract printable strings.
The command above will extract the content of 8 sectors from the disk image, starting from the specified offset, and then filter out and display any printable strings present in that extracted data.
How did we arrive at 8 sectors? The choice to analyze 8 sectors stems from the disk image’s 512-byte sector size, enabling efficient examination while capturing initial file system structures. This approach provides a manageable sample size for exploration, aligning with common practices in disk forensics and analysis.
Time to do a bit more digging. I have used several keywords to search the output such as “.txt”, “flag” and “file”. We’ll potentially discover more interesting files.
$ icat -o 0001140736  disk.flag.img 8 | strings | sort | uniq | grep "file"

base.files
bootchart.files
btrfs.files
cachefiles
cachefiles.ko.gz
cryptkey.files
cryptsetup.files
dhcp.files
ewaitfile
filelayout
flexfilelayout
https.files
innocuous-file.txt
keymap.files
lvm.files
nbd.files
network.files
nfs_layout_flexfiles.ko.gz
nfs_layout_nfsv41_files.ko.gz
original-filename
profile
profile.d
raid.files
wireguard.files
xfs.files
zfs.files
The entry “original-filename” stood out for me as well as the original “innocuous-file.txt” we found earlier. Let’s view the contents in Hex.
icat -o 0001140736 disk.flag.img 8 |xxd | grep ".txt"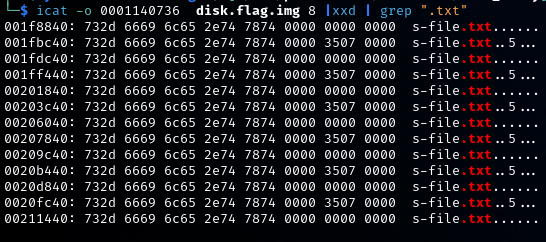
Using icat, we read data from sector 8 of partition 3 in the disk image starting from the offset 0001140736, then converted the output to hexadecimal format using xxd, and finally searched for lines containing “.txt” using grep.
After some more experimentation, we have expanded our grep search to display 3 lines (-A3 )of context after each match.
icat -o 0001140736 disk.flag.img 8 |xxd |grep ".txt" -A3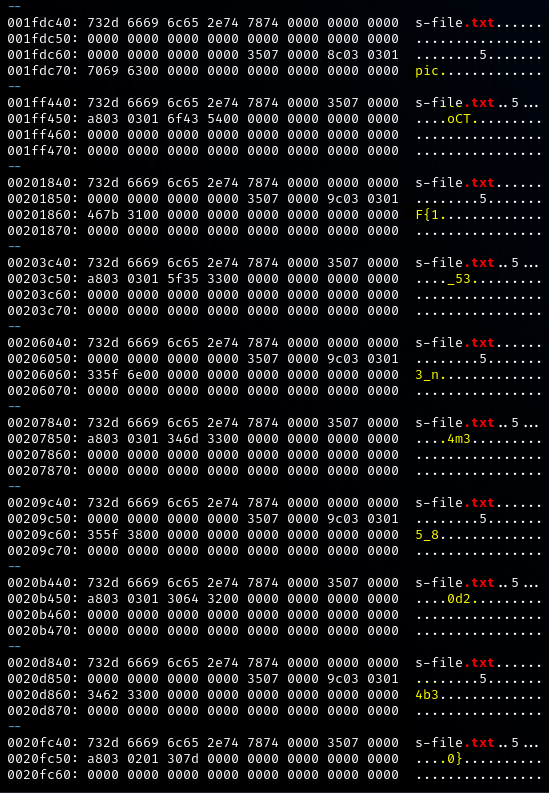
As you glance through the results, you’ll spot fragments of the flag emerging (highlighted in yellow). Piece them together to reveal the full flag.
As mentioned earlier, this task could be completed more swiftly and effortlessly with tools like Autopsy and FTK. However, we opted for the challenging, I mean, educational route to explore additional tools along the way!
Before we conclude, here’s a roundup of all the handy tools for investigations like this one. Take note of them and consider exploring them further, as they might prove useful in future challenges.
- file: A command-line tool used to determine the file type of a specified file or files.
- mmls: A command-line tool used to display the layout of partitions within a disk image.
- blkls: A command-line tool used to list file system data units (e.g., blocks) within a disk image.
- fls: A command-line tool used to list files and directories within a file system.
- fstat: A command-line tool used to display file system metadata information.
- istat: A command-line tool used to display metadata information for a specific inode.
- ils: A command-line tool used to list information about allocated and deleted files within a file system.
- The Sleuth Kit (TSK): A collection of command-line digital forensic tools for analyzing disk images and file systems.
- Forensic Toolkit (FTK): A digital forensics software application for collecting, analyzing, and presenting digital evidence.
- Autopsy: An open-source digital forensic platform for analyzing disk images and investigating digital incidents.
- Foremost: A command-line tool for file carving, used to extract files from disk images and data streams based on file headers and footers.
Flag: picoCTF{1_533_n4m35_80d24b30}
Conclusion
Forensic challenges hold a special place in my heart, offering engaging puzzles that require investigative and detective work. This category is where I discover new tools and techniques the most.
Exploring other write-ups is beneficial for learning different techniques and tools, and providing diverse perspectives on the challenges. Some write-ups are straightforward, while others are more involved and advanced, offering a mix that helps grow your arsenal.
My most intriguing challenge was “Secret of the Polyglot” as it introduced me to chameleon-like files with multiple legitimate functions and formats.
The “Blast from the Past” challenge was quite frustrating at first as I spent two days on the final task of manipulating the final timestamp. I was not expecting EPoch Unix Timestamps to be the hurdle that was embedded into the image file. A good one to remember for future challenges involving timestamps.
The most challenging hurdle I faced was “Dear Diary”. After discovering the easy route using Autopsy, I was determined to find alternative solutions using command-line utilities native to Kali Linux or part of its Forensics packages. Successfully overcoming this challenge was truly rewarding.
This highlights the importance of exploring various tools and techniques, not solely relying on GUI applications for investigative forensics work or incident handling & response. Proficiency in command-line-based Linux tools is essential, especially in scenarios where access to a remote headless server with no Desktop environment is required. Being prepared for such situations is crucial.
As always, thank you for your support and enthusiasm.
I hope this write-up has been of value to you. Please check out my other write-ups for this CTF and others on my blog. 🙏
Now, Go and Play!